Welcome to the March 2021 SOTM Blog Hop featuring the stamp set Winged Masterpiece. This month we have just shy of 20 CTMH Makers sharing projects created with the CTMH Stamp Of The Month Winged Masterpiece. Keep visiting the next blog (typically via a link near the bottom of the post) to get back to the blog where you started.
 |
| Winged Masterpiece - March 2021 SOTM |
You should have arrived here from ***Catherine Nowak's CatScrapbooking***. If you get lost along the way, Melinda Everitt also keeps a list of all participants on her blog at If You Bling It.
 |
| Winged Masterpiece Stamp Set |
I recently saw some cards described as 2 in 1 Thank You cards. The cards were stamped with a floral design, but I thought the Winged Masterpiece stamp set, the butterfly in particular, would be a great set to try this technique. The cards were larger than the CTMH cards, so I took the measurements to Cricut Design Space® and played around until I was happy with measurements that would look good on CTMH's 5½" × 4¼" card bases.
Here are my cards side-by-side.
 |
| 2-in-1 cards created with CTMH SOTM Winged Masterpiece |
In case this technique is unfamiliar to you, a stamp platform is used to stamp the image in the same location on White and a colored cardstock. Then the image on the White cardstock is colored. When the coloring is complete, cut the two stamped images apart and mix up the pieces. Layer them on Black cardstock and use a strip of Black cardstock to mask the seam.
This was a fun and easy card to make.
 |
| card created with Winged Masterpiece |
And both cards are pretty in their own right (if I do say so myself).
 |
| card created with Winged Masterpiece |
Click on any of the images to see a larger photo of the cards (or pattern).
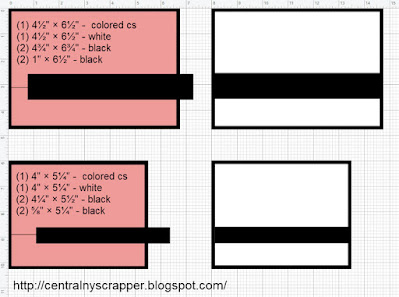
Here is a screenshot of Cricut Design Space® when I was re-working the cutting details to fit on a CTMH card. The top measurements are from the pattern I saw online and the bottom measurements are those I used when creating my cards.
 |
| 2 in 1 Thank You Card Pattern |
I cut a piece of White Daisy and a piece of Wisteria at 4" × 5¼" and two pieces of Black at 4¼" × 5½". Using a stamp platform I stamped the butterfly on White Daisy and on Wisteria using Intense Black. I colored the image on White Daisy using the TriBlend™ Markers. When that was complete I cut both the White Daisy and Wisteria at 2¾" from the top. I placed the top of the White Daisy and the bottom of the Wisteria on one card and the bottom of the White Daisy and top of the Wisteria on the other card. I cut a strip of Black cardstock at ⅝" × 5¼" and, after stamping and heat embossing (I am giving you a sneak peek at the February 2021 SOTM), I placed it across the seam. I placed the strip a little lower when the colored image was at the top of the card and a little higher when the colored image was at the bottom of the card. After seeing the card in the photo, I have decided it needs some gems, pearls or sequins; I will be adding them, but it is too dark here to get new photos before the hop.
I am anxious to try this technique again, but this time cutting the image from top to bottom or maybe diagonally. I think it would be fun. I actually have some Grape cardstock cut and stamped, but I ran out of time to color and finish the cards.
Before you head to ***Wendy Kessler's My Scrapbooking Blog***, the supplies I used to create my project are listed below.
All supplies are from Close To My Heart except where noted:
- My Acrylix™ Stamp Sets: Winged Masterpiece — March Stamp of the Month (S2103), Scandinavian Folk Art Greetings — April Stamp of the Month (S2104)
- Cardstock: White Daisy (1385), Black (X6047), Wisteria (X6032)
- Exclusive Inks™ Stamp Pads: Intense Black (Z4189)
- White Cards & Envelopes Value Pack (X254)
- Heat Embossing: Anti-static Pouch (Z4220), White Daisy Pigment Pad (Z2863), White Super Fine Embossing Powder (Z2068), Heat Tool (Z4252)
- TriBlend™ Markers: Gold Yellow (Z2519), True Black (Z2498), Pale Pink (Z2496), Hydrangea (Z2494), Lavender (Z2493), Ice Blue (Z2490), Dull Green (Z2486), Citrus (Z2482), Orange (Z2480)
- Supplies not from Close To My Heart: Tim Holtz Stamp Platform
If you have a few moments, I would love to know what you think about this technique and if you have tried it before. I hope you are enjoying the projects created with Winged Masterpiece. Thanks for hopping with us!
So you do not have to scroll back up, the next stop on the hop is ***Wendy Kessler's My Scrapbooking Blog***.
Very interesting technique and something I haven't seen. Thanks for sharing! The card is great!
ReplyDeleteI am going to have to try this technique. I love the looks of these cards, so simple but lovely.
ReplyDeleteI love how these look! Great job!
ReplyDeleteWow that is a fun technique with an impressive result!
ReplyDeleteCool technique! You have TWO pretty cards!
ReplyDeleteGreat idea! I will definitely have to try this!
ReplyDeleteThese are so pretty and I love that technique!
ReplyDeletePretty cards!
ReplyDeleteWhat a great technique! And this was the perfect set to use it with!!
ReplyDeleteI have not seen this technique! I love seeing them side by side!
ReplyDeleteI also like to use DS for planning purposes. What a fun card!
ReplyDeleteWhat unique cards and a great sketch!
ReplyDelete