Pages

Monday, August 30, 2021

CTMH Tutti Frutti Summer

When it is too hot for my liking, I try think of and do things that remind me of cooler days. I will watch television programs that feature snow, eat food that does not require cooking (or cook outside) and craft with products and themes that are "cooler". While it does not help a lot, it helps a bit and some relief is better than none.

card created with Tutti Frutti Summer

Today was one of those a little too warm for my liking days. I have been wanting to use the Tutti Frutti Summer stamp set some more (just a friendly reminder that the SOTM is only available through August 31), so I decided to make this refreshing card. I kept my glass of Northern Tea (unsweetened) close and thought of lemonade and Cherry Limeade while making this card.

After the Intense Black ink dried, I colored the lemon in "hello" by dipping a Small Round Waterbrush in the ink on the lid of the stamp pad to grab some color and painted it on.

All supplies are from Close To My Heart except where noted:

I hope you are finding a way to beat the heat.

Sunday, August 29, 2021

Boo Crew Swing Cards Follow-Up

I planned to share some of this information on the Boo Crew Blog Hop post, but time got away from me and I was barely able to get my post published prior the the start of the hop. Today was busy with doing some of the things I pushed off while creating cards for the Boo Crew hop, including cleaning, cutting and freezing green peppers for use over winter. Getting veggies ready to freeze can be a lot of work, but it is fantastic to have them to put on pizza, in chili, etc.

If you hopped with us, you know I created four swing cards for the hop; here is one of them:

swing card created for Boo Crew Blog Hop

I wrote up how I assembled the swing cards, but I thought a few photos might be helpful.

Prepare the card front layer by either using printed cardstock, CTMH patterned paper, scoring, embossing, debossing cardstock, etc., and cut a circle in the front where the top of the swing should be.

Prepare the swing mechanism. Layer the smaller circles together using a wet adhesive (I used the Dual-tip Permanent Glue Pen (Z3440), the Dual-tip Multi-bond Glue Pen (Z3441) will also work), then layer the stack of smaller circles in the center of a larger circle.

swing card swing mechanism
Do not add the second larger circle at this time. Some additional preparation of the card front layer needs to be done.

Add 3-D Foam Tape to the back of the card front layer.

3-D Foam Tape on back of the Swing Card

It is important to note that the swing mechanism is not "attached" in this photo, it is only in place temporarily to assist with placing the adhesive. The adhesive cannot be too close to the swing mechanism or the swing cannot freely move. I used several strips of 3-D Foam Tape to reduce the risk that my card front layer will "cave in" when being mailed.

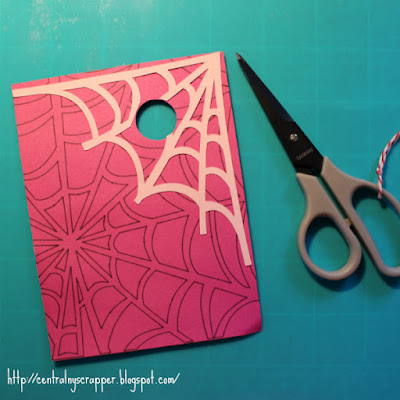
You may want to skip this step because sometimes the swing stopped or hung on the right edge of the Corner Web Overlay. Alternatively, you could snip the right "leg" of the Corner Web Overlay or make the entire overlay a little smaller.

swing card trim overlay
swing card snip overlay

If you decide to add a decorative layer like the Corner Web Overlay, you will need to snip the pieces that cover the circle. I made the cuts with scissors because this area will be covered by the swing mechanism and another decorative layer. I choose to not cut the circle on the Cricut® because I could change my mind about where to place the Corner Web Overlay.

Check swing mechanism
check height/depth of swing mechanism

After applying the 3-D Foam Tape and the optional Corner Web Overlay (do not let the photo fool you, I almost forgot the attach the Overlay), place the swing mechanism behind the card and verify it is high/deep enough to swing. My card was not laying flat, so I used my hand to flatten it and check. If it seems too low, add a few more smaller circles to the stack. If it is high enough, use wet glue to add the second large circle being careful so no glue gets on the card front layer; the circles should move freely.

Swing mechanism in place
swing mechanism in place

The second circle is in place creating the swing mechanism for a card. Add this layer to the front of a card from the White Cards & Envelopes Value Pack (X254).

Photo opportunity missed...The reasons for two of the shadow layers is to make the back of the swinging icon smoother, to create a space to hide the stack the elevates the swinging icon and helps reduce friction and to surround the swing (especially for narrow swings like a spider web thread) to make it stronger.

Create another stack of small circles and place on the back of the element that will swing.

elevating the swinging element

Gather the embellishments and start decorating the card.

embellishments and adhesives
embellishments and adhesive to decorate card front

Add your embellishments to the card. I used wet glue for everything. If you are using a clock or other "directional" icon, but sure to attach it with the right side up. Do not forget to only add adhesive to the very top of the swinging element.

Don't forget to finish off your project by adding a stamp to the back of your card and writing or signing your name so the recipient knows you made it.

signed back of card
signed back of card

On my card I used the Angel Policy Stamp Set (A1086) from Close To My Heart (read more about the CTMH Angel Policy here) and the "waste" bat from the Artbooking collection Bat Circle (#M46C7D).

If you wanted to try a swing card and found the written instructions a little difficult to follow, I hope the process photos are helpful. If you create a swing card, I would love to see your creation. Please leave a comment with the URL to your blog post, send me a message using the contact form to the right or tag me on Facebook - https://www.facebook.com/centralnyscrapper.

Saturday, August 28, 2021

Boo Crew Blog Hop

Welcome to the Boo Crew Blog Hop. Today's Boo Crew hop is brought to you by the same group of Close To My Heart Makers who bring you the Stamp Of The Month Blog Hop on the first of each month. Today we are featuring creations using the Boo Crew Collection.

Boo Crew Blog Hop
Boo Crew Blog Hop

Unfortunately at this busy back-to-school time of year we only have six CTMH Makers sharing their creations on this hop, but I know you will find something inspiring on our Boo Crew Blog Hop. If you just happened upon my post, clicking the link to the next blog (often found near the bottom of the page) will take you through the entire Boo Crew Blog Hop.

You should have arrived here from ***ScrappinKaty***. If you get lost along the way, Melinda Everitt keeps a list of all blog hop participants at If You Bling It.

For today's hop I started by creating a swing card (click on any photo for larger image). I created a card using cardstock in the Boo Crew colors to be certain I would have something to share in the event my order experienced shipping delays.

card created for Boo Crew Blog Hop

I became aware of and learned to create swing cards by watching Interactive Cards That Swing & Spin with Robin Feicht during The 2021 Paper Crafts Summit hosted by Rebecca Page.

Here is a quick video showing the card in action:

I designed my swing card in Cricut® Design Space.

Screen Shot of Cricut Design Space Project
Screen Shot of Cricut® Design Space Project

updated Sunday, August 30 - some photos from assembly can be found here; the photos are meant to complement the written information below

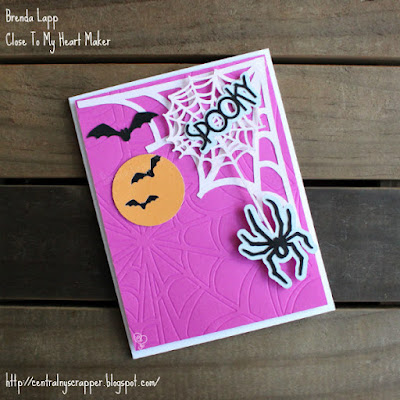
The above screen shot shows all of the pieces used to create my card. The Wild Berry and Black circles (indicated by the shaded rectangles) are the pieces that create the swing mechanism or help it move. I used the Offset tool to create a shadow layer for the spider then I duplicated it. I added a Black circle the same size as the Bat Circle to make the bat cut outs Black. I sized the Corner Web Overlay to fit the upper right corner then I flipped it to use the true Ballerina color while the Spider Web Overlay (with a tall skinny rectangle welded to it) was cut from the light side of Ballerina (when I placed the cardstock on my Cricut® cutting mat, I placed the light side facing up). The Bat and Boo were sized to be a good fit to embellish the card.

On my first card pictured above I used the Cricut® Engraving Tip to "etch" the cardstock. After clicking "Make It" I had to indicate I was using a heavier cardstock than I really was which caused the machine to cut twice. If I were to try the Engraving Tip again, I would hide my other Wild Berry pieces and only Engrave/Cut the card front. When using the Engraving Tip some of the lines were not "etched" as much as I would like, so I used the tip of a craft knife to roughen the cardstock. I became concerned that the spider would not swing smoothly, so I used the Sanding Kit to smooth the card front. At this point I added 3-D Foam Tape to the back of the card front leaving room around the opening.

You may be wondering what that hole in the card front is for. That is where the swing mechanism will be. "Eyeball" where you want the Corner Web Overlay to be; you may need to snip a bit of the web so the swing mechanism can freely move (this will be hidden by the swing mechanism/Spider Web Overlay), then glue the Corner Web Overlay in place. Stack the smaller Wild Berry circles, glue them together with Dual-tip Multi-bond Glue Pen. Once you have your stack, glue the stack to the center of one of the larger Wild Berry circles. Place, without any adhesive, this piece behind the opening. Check that there is sufficient height to your stack so the swing will be able to move smoothly (there should be as I used the same number of circles to create my stack). If there is enough height, add the second large circle to the top of the stack, trying to center it, and being sure that the glue does not seep out and touch the card front–the circle stack needs to be able to move. After the glue is dry, attach the card front to the White Card bast with the 3-D Foam Tape applied earlier.

With the Dual-tip Multi-bond Glue Pen, glue the Spider Web Overlays together. This was done to create a stronger "thread" for the spider to hang from. Glue the "thread" between the shadow pieces. Attach the Spider Web Overlay to the Wild Berry circle, again being certain no glue seeps on the card front preventing the circle from being able to move. Create a stack from the Black Circles and apply to the back shadow piece (this makes the spider have approximately the same height as the web and reduces the paper-to-paper contact or friction) so the piece moves more easily.

When the swing mechanism is done and you have a Long Leg Spider that will swing side-to-side, embellish the card with the other pieces. I added Black Shimmer Brush to the Long Leg Spider and Boo before attaching. I avoided placing the die cuts too low on the card front so they would not interfere too much with the Long Leg Spider's swing.

close-up of Spider & Boo with Black Shimmer Brush
close-up of Spider & "Boo" with Black Shimmer Brush

I hope my written description is easy to follow; I hoped to add some step-by-step photos, but ran out of time (it is 8:53pm as I am writing this).
 
Once my Boo Crew order arrived, I created two cards using the Boo Crew papers.
 
card created for the Boo Crew Blog Hop
card created with Boo Crew papers

I created a stencil using the Spider Web Overlay from the CTMH/Cricut® Artbooking collection. Then I used Spiced Marmalade and Seedless Preserves Distress Oxide™ Inks to color the spider paper. I used the a tag and the font from Artistry to say "Happy Halloween" and the Spider Overlay from Artbooking to embellish. After cutting the spider from Wild Berry cardstock, I covered it with Clear Shimmer Brush before attaching to the card.

card created for the Boo Crew Blog Hop
card created with Boo Crew papers

For this card I created a stencil using the Corner Web Overlay and I inked with Seedless Preserves. I cut a strip of the word paper and the Long Leg Spider from Black cardstock to embellish. Before added the spider to the card, I covered it with Black Shimmer Brush. The tag and font are from Artistry.

Here are some additional cards I created for the hop. I wanted to try some different ways to create a backgound on the Cricut® and some different swinging icons.
 
card created for Boo Crew Blog Hop

The background was created with the Spider Web Overlay and a Cricut® Black Pen.

card created for Boo Crew Blog Hop

I created one background with the Cricut® Scoring Wheel (2 passes) and one using the Cricut® Fine Debossing Tip. I think the card above is the card with the Cricut® Fine Debossing Tip, but honestly I lost track of them.

card created for Boo Crew Blog Hop

I think this is the background that was created using the Cricut® Scoring Wheel.

I hope you like the creations I shared today. Before you go to see what fabulous item ***My Heartfelt Sentiments*** is sharing with us today, the supplies I used to create my project are listed below.

All supplies are from Close To My Heart except where noted:

  • Patterned Paper: Boo Crew (CC8212) or Boo Crew + Sticker Sheet (CC8211)
  • Cardstock: Boo Crew Coordinating CS (CC8213) or Ballerina (X6036), Black (X6047), Nectarine (X6043), White Daisy (1385), available September 1: Wild Berry (X6046), retiring August 31: Pebble (X5955)
  • White Cards & Envelopes Value Pack (X254)
  • Black Shimmer Brush (Z4224), Clear Shimmer Brush (Z3293)
  • Distress Oxide™ Ink Pad: Spiced Marmalade (Z3829), Seedless Preserves (Z3835)
  • Mini Ink Blending Tool (Z3886), Mini Ink Blending Foam (Z3887)
  • Dual-tip Multi-bond Glue Pen (Z3441), Dual-tip Permanent Glue Pen (Z3440), 3-D Foam Tape (Z1151)
  • Sanding Kit (Z1294) - retired
  • Cricut® Maker™ (HB1076)
  • Cricut® Collections - if you do not have a Consultant, please shop for the digital collections via my Cricut® Affiliate Link, otherwise ask your Consultant for their affiliate link
    • Cricut® Artiste shapes:
      • Clock Tag (#M3984D)
    • Cricut® Artistry shapes:
      • Font
      • Dream Big (#M4171A5)
    • Cricut® Artbooking shapes:
      • Spooky Layout (#MB013A)
      • Long Leg Spider (#M408C2) - used the Offset feature to create a Shadow layer
      • Corner Web Overlay (#M3DD29)
      • Bat Circle (#M46C7D) - added a black circle behind so the bat would be black
      • Bat (#M46F6B)
      • Boo (#M47070)
      • Spider Web Overlay (#M3CDA5) - welded a tall skinny square to create the thread the spider is descending on
      • Crow (#M432C8) - used the Offset feature to create a Shadow layer
      • Trick or Treat Title (#M3E0BC) - used the Offset feature to create a Shadow layer
      • Beware (#M3F135) - used the Offset feature to create a Shadow layer
      • Mouse Overlay (#M3DD60) - used the Offset feature to create a Shadow layer
      • Tree Branch (#M42773)
      • Spider Overlay (#M3FA6C) - used the Offset feature to create a Shadow layer
      • Spooky (#M3FE2A) - used the Offset feature to create a Shadow layer
  • Supplies not from Close To My Heart: Cricut® Design Space, Cricut® Engraving Tip, Cricut® Fine Debossing Tip, Cricut® Scoring Wheel, Cricut® Black Pen
If you are not working with a CTMH Maker, you may purchase the supplies I used at my eCommerce website.

I enjoy reading your comments, so if you have a few moments, please let me know what you think of my Boo Crew creations. I hope you are enjoying all of the projects created for the Boo Crew Blog Hop. Thank you for hopping with us!

So you do not have to scroll back up, the next stop on the hop is ***My Heartfelt Sentiments***.

Isabella Card Workshop - Project 3

I recently created some cards with the Isabella Cardmaking Workshop from Close To My Heart. Some of the phrases did not work for me, or I did not want to create four of exactly the same card, so I shopped my stash to create different phrases on my cards.

cards created with Isabella Cardmaking Workshop

The card on the left was created following the directions in the Workshop Guide; the card on the right and the two cards below were modified. The card on the right uses "Fabulous" from the Isabella Cardmaking Workshop.

cards created with Isabella Cardmaking Workshop

The card on the left in the photo above uses "Wonderful" from Shared Happiness Stamp + Thin Cuts (Z3642) and the "Just Because" is from Simple Florals Stamp + Thin Cuts (Z3724).

A couple of other notes about my cards:

When I cut the Isabella patterned paper pieces, I cut along the edges of the squares rather than using the measurements in the Workshop Guide. This allowed me to be certain that I did not have any partial "quilt-block like" images on the top, bottom or sides of that piece.

I also "gutted" the center two "quilt-block like" squares from the Isabella patterned paper piece to use on another project that I hope to be able to share before month's end. Looking at my cards now, I see I could have taken the entire strip out of the center and no one would have been aware since the Ballerina cardstock would have hidden that. The only draw-back to that would be needing to line up the patterned paper, but I do not think that would be very difficult.

I hope you like the changes I made, minor as they are. If you have a few minutes, leave me a comment with your thoughts. Thank you for stopping by today.

Friday, August 27, 2021

Card Created with Isabella—Scrapbooking Stamp + Thin Cuts

When I was reading an email from a big box craft store a card caught my eye. I was probably drawn to it because it had a floral design, but there was something unique about it. The floral design was recessed. I found a video to learn how it was created so I shopped to stash to make something similar.

Card Created with Isabella—Scrapbooking Stamp + Thin Cuts

To create this card I cut a piece of cardstock and a piece of Watercolor Paper (I used the Watercolor Paper carried prior to the Distress Watercolor Cardstock) to 4" x 5¼". I centered the Thin Cut on the cardstock, used low tack tape to hold the die in place, then cut. Then I layered the cardstock on the Watercolor Paper, lined up the stamp inside the opening, placed the stack in a stamp platform and picked up the stamp (this can also be done with a clear block, but my hand are not always steady enough). I moved the cardstock aside, inked the stamp with Intense Black and stamped. When the ink was dry, I watercolored. When the paint was dry, I applied the Watercolor Paper to a card front with a flat adhesive. I used Tombow® Permanent Adhesive. I applied 3-D Foam Tape to the back of the cardstock, then added it to the card front making sure to align the cut out with the stamped image. I embellished with Silver Loose Sequins, attaching the sequins with the Dual-tip Multi-bond Glue Pen.

Please note a few of the items I used are retiring on August 31: Lilac cardstock, Isabella—Scrapbooking Stamp + Thin Cuts, Tombow® Permanent Adhesive.

All supplies are from Close To My Heart except where noted:

I hope you like my version of this card idea. I would love to know what you think of it. If you have any questions about the technique, feel free to ask in the comments below. Thanks for visiting today.

Wednesday, August 25, 2021

One Week Remaining For CTMH Retiring Items

Only a few days remain in August. The retiring items in the Core Products Catalog are only available until 11:59pm MDT on August 31 (if they are not already sold out).

Core Products Catalog

There are a few colors that retire on August 31:

2021 CTMH Retiring Colors

The cardstock, Exclusive Inks™ Stamp Pads and Exclusive Inks™ Re-inkers in these colors are available while supplies last.

The retiring list in PDF format can be downloaded here or you will find the list in Excel format here.

If you have difficulty downloading files, the list is on the Google Sheet below, just switch to the Retiring List tab. The Sheet also includes any catalog corrections and the unavailable (will not be restocked) and backorder (not ready to ship immediately) lists.


The same is true for the July–August 2021 Catalog; it also expires 11:59pm MDT on August 31.


July–August 2021 Catalog

Finally, there are a few specials that are ending on August 31: 

Holiday Stories

Story by Stacy™ Holiday Stories Sale

The Holiday Stories Sale flyer provides the details about this sale. Click on either image for a better view or download a PDF of the flyer here.

Holiday Stories Sale Flyer - page 1
Holiday Stories Sale Flyer - page 2

A workshop kit includes almost everything you need to complete a 6" × 8" album; just add photos, adhesive and a journaling pen.


Bring Back My Pack—White Pines

Bring Back My Pack—White Pines

It is Christmas in July, with Bring Back My Pack—White Pines, but this is a great winter-themed paper too if your celebration does not include Christmas. White Pines was originally introduced September 2015 in Holiday Expressions 2015. Back then the featured colors were Champagne, Chocolate, Colonial White, Cranberry, Fern and Glacier. For this Bring Back My Pack the papers have been refreshed with current colors: Avocado, Candy Apple, Espresso, French Vanilla, Glacier, and Toffee. There is a Sticker Sheet this time too.

This flyer has more information about White Pines (click on an image for a better view) or download a PDF of the flyer here).

Bring Back My Pack—White Pines
flyer page 1
Bring Back My Pack—White Pines
flyer page 2
Bring Back My Pack—White Pines
flyer page 3

The White Pines special features a Scrapbooking Workshop Kit and a Cardmaking Workshop Kit. Instructions will be available for download from the product page (look for the link below the "add to cart" button).

Thank you for stopping by today. If you have suggestions for beating the heat (besides sitting where there is A/C), please let me know. Stay cool!

Friday, August 6, 2021

2021 CTMH Retiring Colors

During the Close To My Heart Virtual Convention we learned the following colors are retiring from the CTMH Color Palette.

2021 CTMH Retiring Colors

The cardstock, Exclusive Inks™ Stamp Pads and Exclusive Inks™ Re-inkers in these colors are available while supplies last.

In addition, a few more items were added to the retiring list. The retiring list in PDF format can be downloaded here or you will find the list in Excel format here.

For those who have difficulty with downloading files, the list is on the Google Sheet below, just switch to the Retiring List tab. The Sheet also includes any catalog corrections and the unavailable (will not be restocked) and backorder (not ready to ship immediately) lists.


The Close To My Heart September 2020–August 2021 Core Products catalog is valid until August 31, 2021. Items on the Retiring List are only available while supplies last.

Sunday, August 1, 2021

CTMH Tutti Frutti Summer SOTM Blog Hop - August 2021

Welcome to the August 2021 SOTM Blog Hop featuring the stamp set Tutti Frutti Summer. This month we have a few shy of 15 CTMH Makers sharing projects created with the CTMH Stamp Of The Month Tutti Frutti Summer. To see all of the projects keep visiting the next blog (typically via a link near the bottom of the post) to return to the blog where you started.

Tutti Frutti Summer - August 2021 SOTM

You should have arrived here from ***Show and tell with Michelle***. If you get lost along the way, Melinda Everitt keeps a list of all hop participants on her blog at If You Bling It.

Tutti Frutti Summer Stamp Set

After seeing the layout the CTMH Corporate artists created, I was inspired to use the Distress Oxide™ Inks to create a background for my card.

card created with Tutti Frutti Summer

I cut a piece of Distress Watercolor Cardstock to 3" x 5" then colored it from left to right with strips of Candied Apple, Spiced Marmalade, Abandoned Coral and Mustard Seed. I used a Ranger Distress Sprayer to mist the surface then used a paper towel to blot the water. I used a Heat Tool to be certain the surface was dry then I stamped the fruit with Black ink. When the ink was dry I added a little green Watercolor Pencil (I did not add water), where the leaves and rinds are.

Because I had a limited amount of space remaining for the sentiment, I turned to my Cricut® Maker™, Cricut® Design Space and the Close To My Heart Cricut® Collections. Using the Cricut also helped me with spacing. I sketched my card design in Design Space then tried out fonts until I found one that I liked with my stamping.

screenshot of Design Space Project

I kept changing my mind about how to place the Green Apple, the light side on the card base or the light side as a shadow to the letters. Sometimes when I changed colors I would have to go into the advanced color area to select the color again so I decided to put color swatches on my project to avoid that.

I knew adding the letters to my project would be a little difficult to center top-to-bottom so I attached a set of letters to a rectangle and cut all of it out. Then I centered the rectangle on the card front and pieced the Green Apple letters through the negative. Then I added the Black letters slightly offset to create a shadow effect. Unfortunately it does not show that well in the photo.

The only cuts I made from the above project are the Green Apple letters and the letters attached to the rectangle cut from Black. All of the other shapes were for my "sketch" or color swatches.

I started another card using Seedless Preserves, but ran out of time to complete it prior to the hop. I will try to share it in a few days.

Before you head to see what the talented ***Darlys Recker*** created, the supplies I used to create my project are listed below.

All supplies are from Close To My Heart except where noted:

If you are not already working with a CTMH Maker, you may purchase all of the supplies I used at my eCommerce website.

I love to read what folks think of my creations. If you have a few moments, please leave a comment letting me know what you think of my card. I hope you are enjoying the projects created with Tutti Frutti Summer. Thanks for hopping with us!

So you do not have to scroll back up, the next stop on the hop is ***Darlys Recker***.

August 2021 CTMH News

How can it be August 1? I am writing this on July 31; all day long my mom has been thinking it is Sunday and I have to tell her it is Saturday, but I am also thinking how can tomorrow be the first day of August? Does the time seem to move faster because I am getting older or because I have lost all ability to budget/manage my time? I guess I need to re-teach myself the time management skills I think I had when I was in school.

August 2021 Stamp Of The Month Tutti Frutti Summer

Tutti Fruitti Summer (S2108) available August 2021
Tutti Frutti Summer (S2108)
available August 2021

Tutti Frutti Summer (S2108) is an exclusive D-size set of 15 stamps and is only available during the month of August 2021. Receive the stamp set for free when you are a CTMH VIP Customer and you place a qualifying order. Alternatively, place a qualifying order and the stamp set is only $5. In either case you qualify for additional sets at $5 for each additional $50 you spend on the same order. Tutti Frutti is also available for $18.95 with no other purchase required. The recommended CTMH My Acrylix® Blocks for this stamp set are: 1" × 1" (Y1000), 1" × 3½" (Y1002), 2" × 2" (Y1003), 3" × 3" (Y1006) and 2" × 6½" (Y1010).

The CTMH Art Department created a scrapbook layout using the Tutti Frutti Summer stamp set.

scrapbook layout created with Tutti Frutti Summer

The Recipes, a PDF file that lists the products used to make the samples in the July–August 2021 Catalog, lists everything used to create the cards above. You will find the Recipes under the page-turner catalog here. I am participating in a Tutti Frutti Summer blog hop this month; you will find my post on this blog tomorrow. Please visit my August SOTM (S2108) Tutti Frutti Summer Pinterest Board for other ideas to use the Tutti Frutti Summer stamp set.


Boo Crew

Boo Crew
Boo Crew

As we approach autumn, it is time to start thinking of the upcoming Halloween season. CTMH created this fun Boo Crew collection to document the season.

The Boo Crew collection includes an exclusive paper packet available with or without a sticker sheet, coordinating cardstock pack (with a look at the new color of the year), stamp set, stamp + Thin Cuts, and Boo Crew Sequins. There is a Workshop Kit and a Product Bundle (please see the flyer or product page for a list of included items); both are at a discounted price.

This flyer has more information about the Boo Crew Collection (click on either image for a better view) or download a PDF of the flyer here.

Boo Crew - flyer page 1
Boo Crew - flyer page 2

The Boo Crew special features a Workshop Kit with instructions to create three 2-page layouts and six treat containers. Instructions will be available for download from the product page (look for the link below the "add to cart" button). Boo Crew is available through August 31 while supplies last.


Bring Back My Pack—White Pines

Bring Back My Pack—White Pines

It is Christmas in July, with Bring Back My Pack—White Pines, but this is a great winter-themed paper too if your celebration does not include Christmas. White Pines was originally introduced September 2015 in Holiday Expressions 2015. Back then the featured colors were Champagne, Chocolate, Colonial White, Cranberry, Fern and Glacier. For this Bring Back My Pack the papers have been refreshed with current colors: Avocado, Candy Apple, Espresso, French Vanilla, Glacier, and Toffee. There is a Sticker Sheet this time too.

This flyer has more information about White Pines (click on an image for a better view) or download a PDF of the flyer here).

Bring Back My Pack—White Pines
flyer page 1
Bring Back My Pack—White Pines
flyer page 2
Bring Back My Pack—White Pines
flyer page 3

The White Pines special features a Scrapbooking Workshop Kit and a Cardmaking Workshop Kit. Instructions will be available for download from the product page (look for the link below the "add to cart" button). White Pines is available through August 31 while supplies last.

I participated in a Christmas in July Blog Hop on July 25; you can see the card and gift bag I created using White Pines on this post.


Holiday Stories

Story by Stacy™ Holiday Stories Sale

The Story by Stacy™ Stories I love Workshop Kits are being featured and there will be the opportunity to participate in a virtual crafting event on August 17 from 4pm to 6pm EDT hosted by Stacy Julian, the creator of the Story by Stacy™ program. If you have not had the opportunity to see one of Stacy's presentations, please make sure you carve out the time on August 17. Stacy is very engaging. Mark  yourself as "Going" on the Event page of the Close To My Heart (Official) Facebook page to receive a reminder of the event.

The Holiday Stories Sale flyer provides the details about this sale. Click on either image for a better view or download a PDF of the flyer here.

Holiday Stories Sale Flyer - page 1
Holiday Stories Sale Flyer - page 2

A workshop kit includes almost everything you need to complete a 6" × 8" album; just add photos, adhesive and a journaling pen.

Holiday Stories is available through August 31 while supplies last.


Craft with Heart™ Subscriptions

Craft with Heart™ Subscriptions

There are a few minor changes coming to the Craft with Heart™ Subscriptions.

Beginning today, only the September–December kits can be selected for a 4-month or 12-month scrapbooking subscription. Also starting today there will be a small price increase on 4-month or 12-month scrapbooking subscriptions. On September 1, the monthly option for the Craft with Heart™ scrapbooking subscription will be discontinued.

VIP Customers can earn 15% in VIP Credit on their Craft with Heart™ purchases.

Anyone who purchases or renew a 12-month scrapbooking or cardmaking subscription between September 2021 and August 2021 will receive a free stamp set in their first subscription box after signing up or renewing.


Core Products Catalog Retiring List

August 2021 is the last month to order from the Core Products Catalog (September 2020–August 2021). The retiring list was shared earlier this month (I posted it on July 11).

Core Products Catalog

The list in PDF format can be downloaded here or you will find the list in Excel format here.

In addition, the list is on the Google Sheet below, just switch to the Retiring List tab. The Sheet also includes any catalog corrections and the unavailable (will not be restocked) and backorder (not ready to ship) lists.


The Core Products catalog is valid until August 31, 2021; items on the Retiring List are only available while supplies last.


July–August 2021 Catalog

July–August 2021 Catalog

This is the last month to order from the July–August 2021 Catalog; it is valid until August 31, 2021. The catalog features two new paper collections, a new Mix-in and many new stamp sets. The catalog can be viewed online here

I participated in a July–August 2021 Catalog New Product Blog Hop on July 18. You can find the cards I created for the hop here.

As always, if you have questions about the CTMH promotions or any products available on my eCommerce website, I can be reached via the Contact Form to the right.

I hope you enjoy this last month before students head back school. Stay safe during this uncertain time.