I planned to share some of this information on the Boo Crew Blog Hop post, but time got away from me and I was barely able to get my post published prior the the start of the hop. Today was busy with doing some of the things I pushed off while creating cards for the Boo Crew hop, including cleaning, cutting and freezing green peppers for use over winter. Getting veggies ready to freeze can be a lot of work, but it is fantastic to have them to put on pizza, in chili, etc.
If you hopped with us, you know I created four swing cards for the hop; here is one of them:
 |
| swing card created for Boo Crew Blog Hop |
I wrote up how I assembled the swing cards, but I thought a few photos might be helpful.
Prepare the card front layer by either using printed cardstock, CTMH patterned paper, scoring, embossing, debossing cardstock, etc., and cut a circle in the front where the top of the swing should be.
Prepare the swing mechanism.
Layer the smaller circles together using a wet adhesive (I used the Dual-tip Permanent Glue Pen (Z3440), the Dual-tip Multi-bond Glue Pen (Z3441) will also work), then layer the stack of smaller circles in the center of a larger circle.
 |
| swing card swing mechanism |
Add 3-D Foam Tape to the back of the card front layer.
 |
| 3-D Foam Tape on back of the Swing Card |
It is important to note that the swing mechanism is not "attached" in this photo, it is only in place temporarily to assist with placing the adhesive. The adhesive cannot be too close to the swing mechanism or the swing cannot freely move. I used several strips of 3-D Foam Tape to reduce the risk that my card front layer will "cave in" when being mailed.
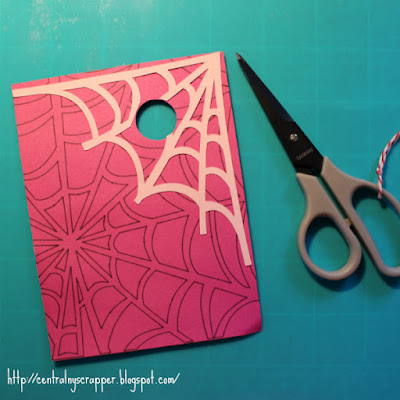
You may want to skip this step because sometimes the swing stopped or hung on the right edge of the Corner Web Overlay. Alternatively, you could snip the right "leg" of the Corner Web Overlay or make the entire overlay a little smaller.
 |
| swing card snip overlay |
If you decide to add a decorative layer like the Corner Web Overlay, you will need to snip the pieces that cover the circle. I made the cuts with scissors because this area will be covered by the swing mechanism and another decorative layer. I choose to not cut the circle on the Cricut® because I could change my mind about where to place the Corner Web Overlay.
 |
| check height/depth of swing mechanism |
After applying the 3-D Foam Tape and the optional Corner Web Overlay (do not let the photo fool you, I almost forgot the attach the Overlay), place the swing mechanism behind the card and verify it is high/deep enough to swing. My card was not laying flat, so I used my hand to flatten it and check. If it seems too low, add a few more smaller circles to the stack. If it is high enough, use wet glue to add the second large circle being careful so no glue gets on the card front layer; the circles should move freely.
 |
| swing mechanism in place |
The second circle is in place creating the swing mechanism for a card. Add this layer to the front of a card from the White Cards & Envelopes Value Pack (X254).
Photo opportunity missed...The reasons for two of the shadow layers is to make the back of the swinging icon smoother, to create a space to hide the stack the elevates the swinging icon and helps reduce friction and to surround the swing (especially for narrow swings like a spider web thread) to make it stronger.
Create another stack of small circles and place on the back of the element that will swing.
 |
| elevating the swinging element |
Gather the embellishments and start decorating the card.
 |
| embellishments and adhesive to decorate card front |
Add your embellishments to the card. I used wet glue for everything. If you are using a clock or other "directional" icon, but sure to attach it with the right side up. Do not forget to only add adhesive to the very top of the swinging element.
Don't forget to finish off your project by adding a stamp to the back of your card and writing or signing your name so the recipient knows you made it.
 |
| signed back of card |
On my card I used the Angel Policy Stamp Set (A1086) from Close To My Heart (read more about the CTMH Angel Policy here) and the "waste" bat from the Artbooking collection Bat Circle (#M46C7D).
If you wanted to try a swing card and found the written instructions a little difficult to follow, I hope the process photos are helpful. If you create a swing card, I would love to see your creation. Please leave a comment with the URL to your blog post, send me a message using the contact form to the right or tag me on Facebook - https://www.facebook.com/centralnyscrapper.
0 comments:
Post a Comment
Thank you for leaving a comment! I enjoy reading them.