Friday, July 15, 2011
Teresa Collins is going to be a host on My Craft Channel
It was announced today on the My Craft Channel Blog. Read the blog how you can win some great prizes. Good luck to you if you enter! You can also Like them on Facebook at My Craft Channel.
Saturday, July 2, 2011
Another Independence Day Banner
Unfortunately I did not get this project uploaded in time for the 1st Unofficial Crop Chocolate Blog Hop, but I thought I would share my newest banner anyway.
I used the Making Memories Slice Design Cutter with “Basics 1” for most of my cuts. I used my Cricut Expression with the “Stand and Salute” cartridge to cut out the “4th of July” design, primarily because I was using pre-glittered paper and could choose the multi-cut feature and set my blade depth so I would not have to use my craft knife to finish the cut (I still had to use my craft knife a bit though). FYI, there is a “4th of July” design on the Making Memories Slice Design Card “Words and Expressions: Holiday”.
 |
| 4th of July design cut from Cricut cartridge Stand and Salute |
I cut 3 red and 3 blue triangles at 4 inches using the Slice. I used my “40 Embossing and Debossing Templates with Storage Binder by Lisa Bearnson” (it was item number F03407 on the Q – I love these, I don’t know why they got so many bad reviews) to create “stripes” on my red triangles and stars on my blue triangles. To emphasize my stars, I used a white gel pen to “stitch” around the stars.

 |
| The red and blue triangles and the letters were cut from Slice Design Card Basics 1 |
Using the “Basics 1” Design Card I cut the letters at 2 inches on the Slice. I ran them right side down through a Xyron to make them sticky and then used Martha Stewart Crafts Tinsel-cut glitter in Crystal to cover the adhesive. I used pop dots to attach the letters and “4th of July” die cut.
I used my Crop-a-Dile to attach the silver eyelets. I used grosgrain and organza ribbon in 3 different widths and colors (red, blue and white) to string the banner pieces together.
 | |||||||
| Completed Banner |
I learned a couple of things making this project. My cat, Pumpkin, is attracted to glitter (she knocked a bottle off the table which blew off the cap and leaked about 1/3 of the glitter – I’ll be seeing sparkles everywhere for weeks) and organza ribbon (she ran off with the end and unraveled almost the entire spool and tried to eat about 1 foot off it before deciding it did not taste good – fortunately she did not ingest it enough to make her choke). I also learned that organza ribbon gets stiff when it gets washed.
I thought a Canada Day Banner would be cute using the Maple Leaf from either the Making Memories Slice “Fall/Back to School” or “Basic Elements & Seasons” Design Cards. In addition to the “Noteworthy” Design Card, I saw images on “Vintage Findings” and “Travel USA” that would make nice “backgrounds” for banners.
I hope you enjoyed my latest project.
Friday, July 1, 2011
Welcome to the 1st Unofficial CC Blog Hop
Welcome to my blog. I'm rather new to maintaining a blog and this is the first time I have participated in a blog hop. I am the 6th blog on the 1st Unofficial Crop Chocolate Blog Hop organized by Scrappy Canuck. If you "stumbled upon" our Unofficial CC Blog Hop, you may want to start at the beginning, a page maintained by Wild Flower, because those that comment on each blog participating in the hop are eligible for the prize drawing.
The project I am sharing today is the nth iteration of a banner I saw in a catalog. My original sketch started out like this:
 The arrow coming in from the right was a reminder to myself with how I could create the stars and stripes. I have a great set of embossing templates I purchased when Lisa Bearnson was demonstrating them on the Q.
Then I thought of this alternate shape for the background and star bling hanging from the bottom of the shape:

Unfortunately I did not see any star bling in the store. Then started going through my Slice Design Guides, the little paper pamphlets that come with the Design Cards, and hit upon a star shape and that's when I came up with this:

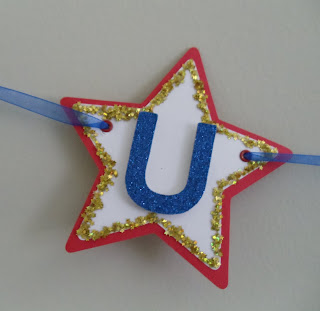
I used my Slice Design Cutter and the Basics 1 Design Card for all of the die cuts. I cut the red star at 4 inches and the white star at 3.5 inches. I cut the letters at 2 inches. When cutting my letters I did not lift my Slice and cut a second time (this is when the hands free kit comes in really handy). The Slice blade was not deep enough to cut all the way through the pre-glittered paper, but there was enough of a indention in the paper so it was easy to use a craft knife to complete the cut. Prior to layering the star pieces, I used gold star glitter on the edges of the white star. I used foam squares cut down to attach the letters. I used red eyelets to create a way to string my die cuts and my Crop-A-Dile to attach them. I used organza ribbon to hang the letters. Here is a close-up of one of the letters:
I hope you enjoyed visiting my page. Don't forget to leave a comment so you are eligible for the prize drawing.The next blog in our hop is Dream Big Cre8tions.

Then I thought of this alternate shape for the background and star bling hanging from the bottom of the shape:


I hope you enjoyed visiting my page. Don't forget to leave a comment so you are eligible for the prize drawing.
Subscribe to:
Posts (Atom)