Sunday, April 29, 2012

CC Challenge #13

The details for CropChocolate Challenge #13 read "Karen and Michele have done this week's challenge: Create a project using the following recipe: Spring themed. Must contain 3 folds somewhere. Use 2 DIFFERENT paper lines." [Details for the current CropChocolate challenge.]

The rules read "Post a picture of your design. 50% of the product used must be from CropChocolate.com. Please include items used in the description of your entry. Contest ends on May 2nd, 2012 at 08:00:00am Mountain. Please submit your entry before then. $10 CropCredit in a random drawing."

I decided to try to meet the criteria for two challenges with this one project. The requirements for other challenge read: "Create a project that includes FABRIC. :)"

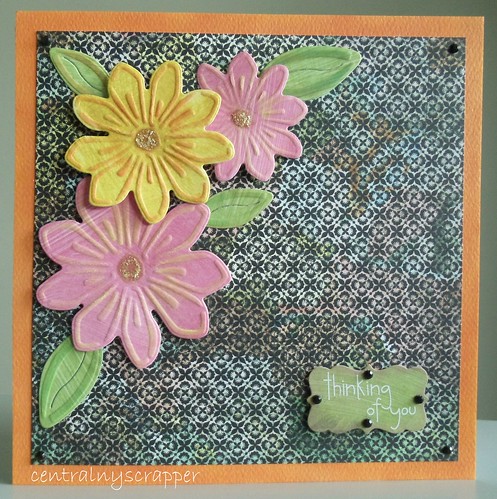
I decided to create a jump-up card (some people call them pop-up cards) because the number of folds helped me meet one of the requirements (and I like how it looks and had not tried one yet). I found how to make it in a leaflet that came with The Ultimate Crafter's Companion. The card base is made from 12x12 BasicGrey Out of Print Etchings (out-3316). I started with a 6x12 piece of cardstock and completed all of the folds to make the card.

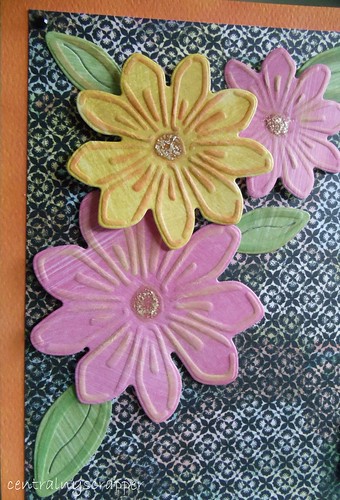
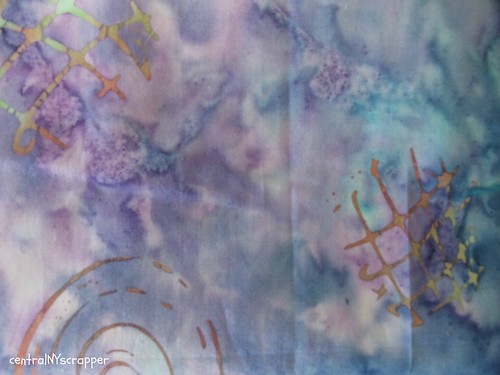
I then pulled out this piece of batik fabric.


I used Sizzix Flower Layers Set #3 and my Big Shot to cut the flowers from the fabric.

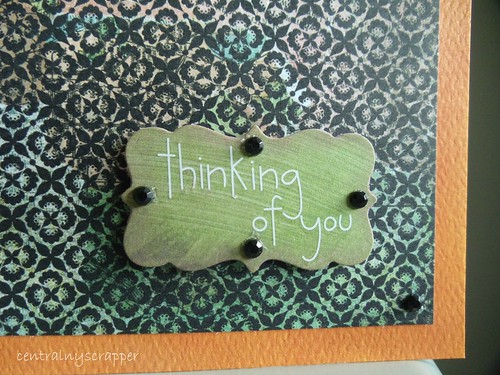
I used Fancy Pants Chi-Chi Fancy-Free Collection by Nancie Rowe Janitz Beautify (item #971), QuicKutz Squeeze and QuicKutz dies to cut my leaves and tag.

I attached the flowers using Making Memories Crystal Brads (light medium square) and the tab using Making Memories Metallic Mini Flower Brads.

Here is a close-up of the flowers:


This photo shows how the card stands on its own:


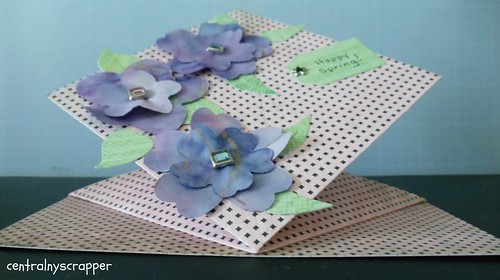
And here is the completed card:


Other products used: The Ultimate Crafter's Companion, Viper by SnakeTape, black gel pen and Zig 2 Way Glue.

I hope that you like my completed project. Comments are appreciated.

I also want to share that I am a relatively new Close To My Heart Independent Consultant. If you ever find yourself wanting any CTMH products, please consider purchasing from me. A link to my on-line store can be found to the right of this post. Thanks for stopping by.

Tuesday, April 24, 2012

CC Challenge #12

The details for CropChocolate Challenge #12 read "Create a project using a homemade flower." [Click here for information on the current challenge.]

The rules read "Post a picture of your design. 50% of the product used must be from CropChocolate.com. Please include items used in the description of your entry. Contest ends on April 25th, 2012 at 08:00:00am Mountain. Please submit your entry before then. $10 CropCredit in a random drawing."

I was very happy with the first flowers I made (using a punch then rolling them and "manipulating" the petals), but I thought they were too dimensional for use on a card, so I started looking at my other options for creating flowers.

I decided to use my Daisy Head dies from Spellbinders (part of their Shapeabilites line; S4-058). I then went to my stack of 6x6 paper pads and selected Basic Grey's Out of Print collection and here's what I came up with:


And close-ups of my flowers:


And my sentiment:


Items from CropChocolate:
6x6 Out of Print Paper Pad by BasicGrey, 12x12 Orange Citrus Double Dot by BoBunny, Paper Reverie Noir Tape by Making Memories, Slice Tool Kit, Viper Snake Tape

Other items used:
Spellbinders Shapeabilities Daisy Heads (S4-058) with Spellbinders Grand Calibur, Pebbles Rub-ons Thinking of You, Tim Holtz Distress Stickles Scattered Straw, Print 'n Tint Non-Smear Pastels (from The Stencil Collection), Bazzill white cardstock for card base, QuicKutz Label with QuicKutz Squeeze, sticky dots

I used the pastels on the edges of the label and the orange paper in addition to using it on the die cuts. I used a variety of colors until I was happy with the results. 

I am extremely happy with the results. I hope you like my homemade flowers and card as much as I do.

Tuesday, April 17, 2012

CC Challenge #11

The details for CropChocolate Challenge #11 read "Create a project using DeeDee's sketch below. Must include masking!" [Click here for information on the current challenge.]

The rules read "Must use 50% CC product. Deadline is Wednesday, April 18th @ 8am MST."

This is DeeDee's sketch:

I love it! I am starting to really like using sketches.

Here is my interpretation of DeeDee's sketch:

Here is a close-up of my masking and ribbon threading. In the lower left you can also see where I flipped the mask over so the spray would migrate to my paper.
And here is a close-up of my ribbon threading, journaling and a bit of my "reverse masking" and the frame I placed around my photo.

Items from CropChocolate: 12x12 MME Lush Blue Floral Paper (in a paper grab bag); Card Stock 3.0 by Making Memories (https://www.cropchocolate.com/past_scrapbook_deals?pid=234); Viper Permanent Adhesive by Snake Tape; Arctic Blue Glimmer Mist by Tattered Angels

Other items used: QuicKutz label die with Squeeze tool; ribbon from stash; WRMK Sew Ribbon Leaf; black gel pen; mask from stash; Martha Stewart Crafts Punch Around the Page Large Set Twirl Loop

I am still warming up to my layout. I am not sure if I like it yet or not. Thanks for visiting my blog today.

April Challenge - DT Imitations

The {CC Focus Group} April Challenge - DT Imitations: "Create a project using a technique/project that one of the DT girls have taught. 50% CC product required."

I browsed through the DT projects on The Crop, Crop Chocolate's blog [hint - Design Team and Guest Designer Project posts started in June 2011; I am working on pinning all of the projects on my Pinboard Crop Chocolate-Design Team/Guest Designer Posts.] and decided on the Exploding Card by Michele McKay. [Note: the square piece of paper should be cut to 8"x8", not 6"x6"; I send a note to the editor, but am not sure when it will be corrected.] I suggest watching the video because I found it very helpful after I finished scoring.

Products I purchased from CC: MME Lush Blue Floral Paper and MM Design Shop Stickers Family Mother (actually the paper was in a grab bag of paper and the stickers were in hot chocolate).

Other products used: organdy ribbon from my stash.

I used very thick embellishments and needed the ribbon to keep my card closed. The ribbon would not be necessary with thinner embellishments, but I think it adds a nice touch.

Here is the outside of my card:

 And here is the inside:

Since I started with a 6x6 square, I cut the paper for the outside of the card smaller. I think a smaller card would make it perfect to be a "tag" on a gift.

I hope you like my version of an exploding card. Thanks for stopping by.

Friday, April 13, 2012

CC Challenge #10


The details for CropChocolate Challenge #10 read "Yeehaw! How many times have you heard a song that brings back a memory? Let your favorite song be your inspiration for your challenge this week. And, see if you can use some of those items from your HC that you wouldn't normally use. No HC products? No problem, just make sure to use 50% CC supplies." [Click here for information on the current challenge.]

The rules read "Create a project using 50% CC project. Challenge ends April 11th at 8am MST."

I almost didn't do this challenge because I was having trouble coming up with an idea. I don't really have a favorite song. There have been so many great ones throughout the years. On Tuesday evening I was watching television and saw Jason Aldean's video for "Fly Over States". It reminded me how much I love having a window seat when flying and some of the great photos (in my opinion anyway) I have been able to take of the beautiful landscape below. So here is the layout I came up with:


At first I was not happy with it, but it has grown on me. We are often our own worst critic. Here is a close up of my die cut airplane and free cut cloud:


Products used from Crop Chocolate: Sassafras Sweet Marmalade Preserve (received in a grab bag), 12x12 Specialty Paper Multi Pack by Slice (vellum), Making Memories 5x7 Mat Stack, Slice Design Cutter, Hands Free Kit and International Travel design card; item from Hot Chocolate: Making Memories Green Felt Alpha. Other items used: black gel pen, gray cardstock.

I hope you reach for the clouds and try something out of your comfort zone too. Thanks for stopping by.

Thursday, April 5, 2012

Sliding Pop-up Element Card

This is a card based on Scappy Canuck's blog post Supporting OWH (and a tutorial so you can too)! If you have not visited her blog, you really should. There are several tips and tricks and tutorials there.

The card base was very easy to create and it fits into "regular" card envelopes (a huge plus). It took me longer to decorate the card than it did to create the base.

I needed a quick Easter card for my late maternal grandmother's cousin. This is the card I came up with:


Here is a snapshot of the Pop-up Element "popped up":

And here is how I decorated the Pop-up Element:

The products I used to make this card: Echo Park Paper Co.'s Victoria Gardens and coordinating cardstock. BoBunny Double Dot in Chiffon (bunny) inked with Tim Holtz Distress Ink in Vintage Photo. The flowers are from the Making Memories Flower Shop Jar Collection and the ribbon is what was wrapped around the top of the jar. The brad is from MM Fa La La Snowflakes. The bunny is a QuicKutz die.

I hope you will enjoy making cards using this template as much as I do.

Wednesday, April 4, 2012

Tips and Tricks - Blogger (why reinvent the wheel?)

Tips and Tricks - Blogger Help

While creating a couple of my last posts I searched for help for techniques that I was not familiar with. It got me to thinking why reinvent the wheel, that is, why write posts, when someone else has (so far the posts I wrote were things I figured out on my own; as I blog more often I find I need to look for help when trying new techniques)?

I used How to Add a Table to Blogger Blogspot Post to help me create a table in a recent post. I went to their blog home, Blog Know How: Tips, Tricks and Secrets for Blogger.com Bloggers and found they have many tips for using Blogger.

I also used Blogspot 101 – Background Color to help me change the background color of the table so it would not look out of place on my page. Their blog home was RS Designs (which is still available). When you get there look under Categories for Blogger Tutorials. In February 2009 RS Designs became Berries and Cream Blog Design, but thankfully their old posts are still available as I could not find the Blogger Tutorials at their new site. Most of the posts are a few years old, but the one I used was still relevant.

I hope you find these links useful when working on your own blog posts.

Tuesday, April 3, 2012

Tips and Tricks - Blogger Time Zone Setting and Scheduling a Blog Post

One of the problems we encountered during the 2nd Unofficial Crop Chocolate Blog Hop was scheduling blog posts. The time on your computer does not play a roll, you have to set your time zone in Blogger.

Set your Time Zone

  1. go to the home page of your blog, log on if you are not already
  2. look in the upper right corner for Design and click on it
  3. on the left side near the bottom click on Settings
  4. then click on Language and Formatting
  5. under Time Zone choose your time zone
  6. when you have selected your time zone, look in the upper right corner and choose Save Settings

Schedule a Blog Post

  1. while in the window to write your post look for and click on Schedule on the right
  2. choose Set data and time
  3. click in the time box, you'll have the opportunity to use a slider to choose a time or you can type the time just be sure there is a space between the number and AM or PM
  4. click Done; the time you selected with show under Schedule
  5. when you are happy with your post, choose Publish
  6. on the next screen you will see all of your blog posts, past and future; you will see that the post you just wrote says "scheduled"

Time Zone Confusion

 During the blog hop some people where not sure what time to schedule their blog post if they were asked to schedule their post to go live at 12:01 AM Mountain time. If I ever organize (or co-organize) a blog hop again, I think I will just ask everyone to post at 12:01 AM their time. If you are ever asked this again,
  • 2 AM EST = 1 AM CST = 12 AM MST = 11 PM PST
  • I found a time zone converter that you can try
  • some locations do not switch to daylight saving time so watch for that
I hope this helps you with setting the time and scheduling posts on your blog.

Edited to add
While in my office today I noticed a "cheat sheet" I created for myself when scheduling meetings with folks across the United States. I thought you might find it helpful too.

Time Zone "Cheat Sheet"


Eastern Central Mountain Pacific
8 AM 7 AM 6 AM 5 AM
9 AM 8 AM 7 AM 6 AM
10 AM 9 AM 8 AM 7 AM
11 AM 10 AM 9 AM 8 AM
12 PM 11 AM 10 AM 9 AM
1 PM 12 PM 11 AM 10 AM
2 PM 1 PM 12 PM 11 AM
3 PM 2 PM 1 PM 12 PM
4 PM 3 PM 2 PM 1 PM
5 PM 4 PM 3 PM 2 PM
6 PM 5 PM 4 PM 3 PM
7 PM 6 PM 5 PM 4 PM
8 PM 7 PM 6 PM 5 PM

Thanks to How to Add a Table to Blogger Blogspot Post for help adding the table to this blog post and Blogspot 101 – Background Color for how to change the background color of the table.

Monday, April 2, 2012

CC Challenge #9

Challenge #9 - The Man Project

The details for CropChocolate Challenge #9 read "Make a masculine project that must incorporate something that is transparent, clear or a glossy element." [Click here for information on the current challenge.]

The rules read "Post a picture of your design. 50% of the product used must be from CropChocolate.com. Please include items used in the description of your entry. Contest ends on April 4rd, 2012 at 08:00:00am Mountain. Please submit your entry before then. $10 CropCredit in a random drawing."

I had a hard time with this project as I typically only scrapbook vacations and special events. I know, I really need to get working on family history, but there never seems to be enough time. I finally decided on a Father's Day card.

Items I used that are transparent, clear or glossy: mono-filament thread for the fishing line, clear clam-shell packaging for the label and Glossy Accents on a fish and "bobber" die-cut.

Items from CropChocolate: 12x12 Splash Collection Pack by Echo Park; 12x12 Specialty Paper Multi Pack by Slice; 12x12 Dark Blue/Light Blue Cardstock by Echo Park; ribbon from 12x12 Lush Brown Collection by My Mind's Eye; Viper Permanent Adhesive by Snake Tape

Other items used: QuicKutz fishing pole, fish and label dies; QuicKutz Squeeze; vellum; white cardstock greeting card; mono-filament thread, Glossy Accents; Xyron 150 Create-a-Sticker; clear clam-shell packaging; black gel pen

Here's the card I submitted:


 Here's an attempt at giving you a better look at the mono-filament thread I used:


The Glossy Accents used on die-cuts:


 And a better view of the label cut from clear clam-shell packaging, but it is almost impossible to see it.


 I hope you enjoyed the project I shared (and submitted for Challenge #9). Comments are appreciated. Thanks for stopping by.