
You should have arrived here from ***jd designs by Jennifer Dykstra***. If you get lost along the way, Melinda Everitt keeps a list of participants on her blog at If You Bling It.
For this card I was inspired by at sketch at Scrapbook & Cards Today The Blog: World Card Making Day 2015 - Sketch challenge!
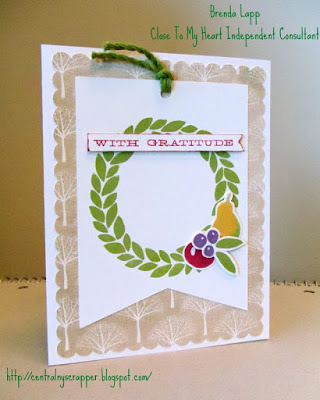
On the pear stamp I used the rock and roll technique on the right side (from the Clearly the Best: Rock & Roll video) and the facial tissue technique for the stem (from the Cricut® Artistry Collection video).
One note about the scalloped background cut from White Pines; I was not happy with how the scallops looked when I unlocked the proportions and changed the cut size so I duplicated the image, overlapped the four duplicate images to create a rectangle approximately 5¼" x 4" (using the mat gridlines to approximate size), aligned the scallops and welded the images.
Since I am not sure I am explaining this well, here is a screenshot:

If you try this yourself and run into trouble, comment below and I will do my best to explain this better.
This next project is, in my opinion, a great gift idea, but I am having trouble finding a night light with a similar shade. I am thinking they would be great for anyone, e.g., teachers, co-workers, book clubs, etc. you need an inexpensive, yet personal, gift to. You could include several stamped images for the recipient to use at different times of the year. You could also use their monogram. This is what the light looks like at night.

Since the above photo does not show the stamps and coloring very well, here are some daytime photos. My goal with this photo is to show you how the insert goes into the shade. You can see it is hanging outside the share on the right side.

Since it still may be difficult for some to see the image and coloring, this is the vellum piece with white paper behind it.

If you know where we can find a similar night light for purchase, feel free to leave a link in the comments below. The light I have operates on a switch and has a clear acrylic shade where I can insert the vellum between the two pieces. I found a similar light at a large on-line retailer, but not the shade. Suggestions for an updated light that uses an LED bulb and turns on automatically would be appreciated; I cannot find one of those either.
Before you head to ***Scrap Stamp Share by Tammy Lubick***, the supplies I used to create my project are listed below.
All supplies are from Close To My Heart except where noted:
- My Acrylix™ Harvest Wreath Stamp Set (D1662)
- White Pines Paper Packet (X7200B)
- Colonial White Cardstock (1388)
- 5½" X 4¼" Colonial White Cards & Envelopes, Value Pack (X1410)
- Eggplant Exclusive Inks™ Stamp Pad (Z2647)
- Fern Exclusive Inks™ Stamp Pad (Z2650)
- Saffron Exclusive Inks™ Stamp Pad (Z2651)
- Pomegranate Exclusive Inks™ Stamp Pad (Z2653)
- Fern Thick Twine (Z3093)
- 3L® E-Z Dots® Adhesive (Z3022)
- Thin 3-D Foam Tape (Z2060)
- Cricut® Art Philosophy Collection (Z3171)
- Rectangle - #M4620A - 4x; see above for the details
- Holly - #M44748 - used one of the berries to "punch" hole on the banner
- Cricut® Artbooking Collection (Z3169)
- Pennant Frame - #M3E089 - used hide contour to make the banner
- The Design Space file for the wreath card is https://us.cricut.com/design/#/canvas/31953640
- My Acrylix™ Little Monsters Stamp Set (C1630)
- Basics Exclusive Inks™ Mini Pigment Pads Set (Z2503) - black ink
- Ranger™ Clear Super Fine Embossing Powder (Z2088)
- Craft Heater (Z555)
- ShinHan™ Touch Twin™ Markers in the following colors: Black (Z2446), Lavender (Z2453), Peony Purple (Z2462), Barely Beige (Z2445), Cerulean Blue Light (Z2449), Golden Yellow (Z2452), Pastel Green (Z2459)
- Supplies not from Close To My Heart: Cricut® Design Space, Cricut® Explore, glass mat, craft knife, vellum, night light
I love to hear what people think of my creations, so if you have a moment I would be delighted if you leave a comment.
I hope you are finding much inspiration on this hop. Thank you for visiting today. So you do not have to scroll back up, the next stop on the hop is ***Scrap Stamp Share by Tammy Lubick***.
Love your Harvest Wreath card!! :)
ReplyDeleteI love the clean simplicity of your Harvest Wreath! Very Pretty!
ReplyDeleteLove the nightlight! Too cute!
ReplyDeleteSo clever with the nightlight!
ReplyDeleteAwesome work!!!
ReplyDeleteLove your card, and the nightlight idea is awesome, you can change it out throughout the year.
ReplyDeleteLove the colors in your card - the fruit is so vibrant! What a cute nightlight too!
ReplyDeleteLove your nightlight!
ReplyDeleteThe wreath card colors work very nicely together and I love the nightlight idea.
ReplyDeleteThat wreath card is stunning!
ReplyDelete