Choose your ribbon. The last two flowers I made happened to have scallops on one side, but you could use ribbon that has straight edges on both sides. Then find thread in the same shade (I used contrasting thread in my example so you could see the stitches). Then get a sewing needle with a sharp point and as small an eye as you can thread. Use a small needle so you do not end up with visible holes in your ribbon. You might want to double the thread so it does not break if you have to pull hard (though that has not been necessary for any ribbon I have used).
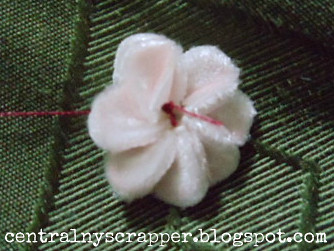
Stitch a running stitch along one edge as seen here:

You can gather (pull the thread/push the ribbon down the thread so the ribbon puckers) as you stitch so you can estimate if you have stitched enough or not. You can gather a little (larger, looser flower; you will need a larger brad or button) like this
or as much (smaller, tighter flower; can use a smaller brad or button) like this
as you would like. Take a couple of stitches on the back so the flower and tie off so the flower will hold its shape. You can gather a longer length of ribbon and "coil it" to make an even larger flower (I "coiled" the ribbon for the flower on my card two times).
I used CTMH Liquid Glass on the underside of the cut edges to prevent fraying but you could turn your ribbon under and take some stitches.
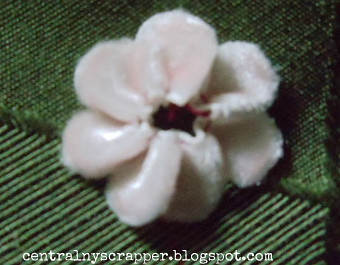
Use a large enough brad or button so that it covers the inside edges of the ribbon. If you make a large flower the brad or button will help give the "petals" dimension by "pulling in" the center of the flower.
Thanks for stopping by. I hope this gives you some ideas for making ribbon flowers. I would love to see the ribbon flowers that you create. Please paste a link to your blog or photo in the comments to inspire me and others.
Thanks for the tutorial on the ribbon flower - the card that you made with this flower is absolutely beautiful!!!
ReplyDeleteCute! I really need to keep a needle and thread in with my crafty stuff!
ReplyDeleteGreat tutorial. I'm anxious to try this out. Thanks for sharing!
ReplyDelete