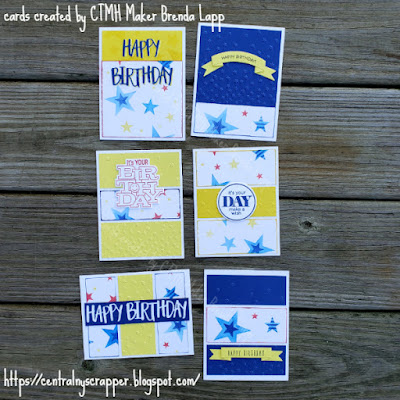
While I have posted other stenciled projects recently, this is one of the first stenciled projects I started. I pulled out of scraps to create with while I got a feel for how to best hold the brush, how much to ink the brush and how much pressure to use. I think it was little bit of fate that pushed this project aside because the It's Your Birthday Stamp + Thin Cuts (part of the National Stamping Month—Say It with Style special), had not been introduced yet when I started.
I used the same One Sheet Wonder idea as when I created the Halloween Cards I shared earlier this month. All of the colored cardstock were either stenciled or embossed so it would not be so plain.
 |
| Birthday Cards created with Stencil Pack 1 |
 |
| Birthday Cards created with Stencil Pack 1 |
I really like how I can pull supplies from my stash to mix with current products create a batch of cards where no two cards are too much alike. I will be giving this group of cards to the local senior citizens group; they have someone makes sure members receive a card at their luncheon when they are celebrating a birthday that month.
Supplies used:
- My Acrylix™ stamp sets: It's Your Birthday + Thin Cuts (CC9237) or It's Your Birthday (CC9233), The Good Life—Cardmaking (C1994), Thoughtful Tokens—September Stamp of the Month (S2309), Just a Number (D1514), stamp (C1804) from Craft with Heart™ Cardmaking subscription September–December 2019 (CHC4201) aka Cardmaking Starter Kit (Z4361) from the 2022 Startup Savings promotion
- Exclusive Inks™: Lemonade (Z6517), Candy Apple (Z6509), Bluebird (Z6508), Sapphire (Z2848)
- Thin Cuts: Stitched Fancy Brackets (Z3686), Party Banners (Z4152), Happy Birthday (Z3304)
- Stencils:
- Stencil Pack 1 (Z7040) or Stencil Bundle (Z5438) from Essentials 2023–2024
- Card Front Stencil Pack 1 (Z7042) or Card Front Stencil Bundle (Z5439) from Essentials 2023–2024
- Stencil Pack 2 (Z4339) or Stencil Bundle (Z4383) from Core Products 2021–2022
- Embossing Folders: Confetti Stars (Z3119)
- tools-ish: 1" Masking Tape (Z4606), Masking Tape Bundle (Z5444) or 4" Masking Tape (Z4607), Blending Brushes (Z4572)
Code to above product name appearance:
- text with link = this is a current product available on my eCommerce site at the time this post was published
- highlighted text with link = this is a product that was available on my eCommerce site when I created the paper craft(s) pictured above and the post was published; since it is on the retiring list and no longer appears in the current catalogs, or it was part of a promotion, it is available only while supplies last
- plain text = retired product no longer on my eCommerce site; if you really like a product, look for it at yard sales, on Facebook groups or other places people resale items
When you get creative the next time, be sure to check your supplies for a fun way to re-use or re-purpose items. I hope you like how I mixed and matched new products with older supplies.
0 comments:
Post a Comment
Thank you for leaving a comment! I enjoy reading them.