Let's start the week on a positive note with some pretty flowers. I mailed the cards shown below last Tuesday; I hope they were received by now and arrived in good condition (I put them in a zip top plastic bag just in case the weather was rainy).
I have been enjoying creating with the newest stencils from Close To My Heart. With White Daisy cardstock, blending brushes and Rosy, Limeade, Jade and Honey Butter Exclusive Inks™, I created this floral sheet.
 |
| stenciled cardstock created with Stencil Pack 1 (Z7040) |
From the floral sheet, I cut using this "guide".
 |
| floral stenciled paper cutting "guide" |
I do not give you exact measurements because you may have other ideas based on what flowers you want to highlight on your cards. When cutting the floral layer, I first trimmed off ⅛" from the left and right sides (indicated by the red in the diagram above). Then I trimmed off ⅛" from the top and the bottom (shown in orange). After I trimmed ⅛" off around the sides, I cut 3¾" from the left and right sides (shown as yellow and green above). When I got to the remaining strip (the middle of the card), the plan was to trim ¼" from each side (indicated with purple) which would leave a 3¾" strip (shown in blue), but in my case I measured wrong (see photo below). It worked out in the end, but you may want to measure better than I did, or you may want a wider "leftover" strip from the middle (or the sides) and try to use that strip on another project. I cut each 3¾" strip into two 5" pieces. When cutting the 5" length, sometimes I started at the top and other times the bottom; on the middle piece I made one cut from the top and the other cut from the bottom because I was not happy with the stenciling I did in the middle – I was a little to "loose" with my circles when blending. Here's my sheet after making the cuts (the ⅛" already hit the recycle bin by the time I took this photo):
 |
| stenciled cardstock cut for cardmaking |
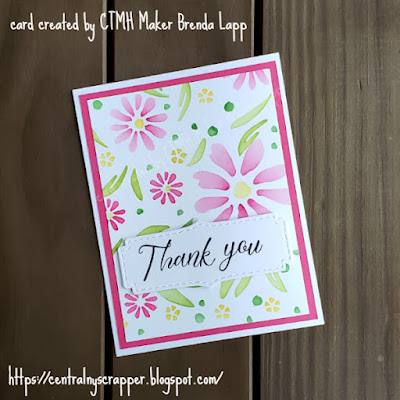
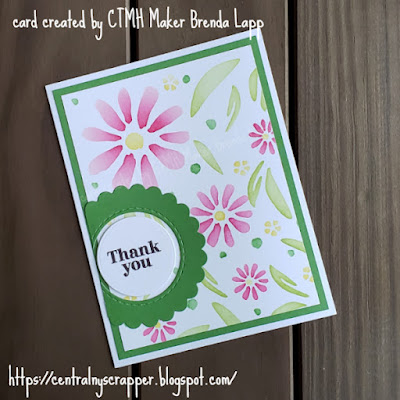
By now you want me to finally show you the cards I created with my stenciled cardstock. Here they are:
 |
| floral card 1 created with stenciled cardstock |
On this card I layered the floral stenciled cardstock on top of a piece of Limeade cardstock (lighter side). I die cut a piece of White Daisy using the Dragonfly Wishes Stamp + Thin Cuts (I am bummed this is no longer on my website – it was when I created my cards) and stamped the coordinating "thank you" from the same set.
 |
| floral card 2 created with stenciled cardstock |
I layered the floral stenciled cardstock on top of a piece of Limeade cardstock (darker side). I cut the words from Jade and Rosy cardstock and layered the die cuts so a bit of the Rosy die cut would create a shadow.
 |
| floral card 3 created with stenciled cardstock |
This time I layered the floral stenciled cardstock on top of a piece of Rosy cardstock (light side). I die cut a piece of White Daisy using the Stitched Fancy Brackets Thin Cuts (if you are saying "wait, the die does not cut that shape", please come back tomorrow for a step-by-step on how I cut the bracket). I stamped the "thank you" from Floral Notes Stamp Set (I applied a piece of masking tape to the stamp, inked, removed the tape then stamped "thank" then repeated to add "you").
 |
| floral card 4 created with stenciled cardstock |
I layered the floral stenciled cardstock on top of a piece of Jade cardstock (lighter side). I die cut a piece of White Daisy using the Dragonfly Wishes Stamp + Thin Cuts and used the "thank you" from Thoughtful Tokens—September Stamp of the Month.
 |
| floral card 5 created with stenciled cardstock |
|
For this card I layered the floral stenciled cardstock on top of a piece of Rosy cardstock (darker side). I die cut a piece of White Daisy using the Dragonfly Wishes Stamp + Thin Cuts and stamped the coordinating "thank you" from the same set.
 |
| floral card 6 created with stenciled cardstock |
On my final card I layered on Jade (darker side). I die cut Jade cardstock with the Scalloped Circle Frame and White Daisy with Circles Thin Cuts. I used a stamp from Flowers Are like Friends. I did not want to cover up too much of the stenciled flowers, so I placed the die cuts off center and trimmed to they did not extend past the Jade layer.
Except for the "thank you" from the For You Thin Cuts, all of the sentiments are popped with Thin 3-D Foam Tape. You can use the Quickie Glue™ Pen or Dual-tip Permanent Glue Pen to adhere the die cuts from the For You Thin Cuts.
Products used to create the Thank You cards:
- My Acrylix™ stamp sets: Thoughtful Tokens—September Stamp of the Month (S2309), Dragonfly Wishes Stamp + Thin Cuts (CC92226), Flowers Are like Friends (C1986), Floral Notes (C1988)
- Thin Cuts: Scalloped Circle Frame (Z4636), Circles (Z3943), Stitched Fancy Brackets (Z3686), For You (Z4650)
- Exclusive Inks™: Rosy (Z6572), Limeade (Z6575), Jade (Z6574), Honey Butter (Z6536), Intense Black (Z4189)
- Cardstock: White Daisy (1385), Rosy (X6072), Limeade (X6075), Jade (X6074)
- White Cards & Envelopes Value Pack (X254)
- 1" Masking Tape (Z4606), Masking Tape Bundle (Z5444) or 4" Masking Tape (Z4607), Thin 3-D Foam Tape (Z2060), Quickie Glue™ Pen (Z1512), Dual-tip Permanent Glue Pen (Z3440), Blending Brushes (Z4572)
Code to above product name appearance:
- plain text = retired product no longer on my eCommerce site; if you really like a product, look for it at yard sales, on Facebook groups or other places people resale items
- italicized text = retired and only used inside the cards
- text with link = this is a current product available on my eCommerce site
- highlighted text with link = this is a product that was on my eCommerce site when I created the paper crafts pictured above and wrote the post, but since it is on the retiring list and no longer appears in the current catalogs, or it was part of a promotion, it is available only while supplies last
If you were thinking the 12" x 12" stencils were only for scrapbooking, I hope I showed that they are much more versatile and can be used for cardmaking and other paper crafting. Be sure to stop back tomorrow to see how I used the Stitched Fancy Brackets to create just the right size die cut for the stamp I used. Have a great week!


0 comments:
Post a Comment
Thank you for leaving a comment! I enjoy reading them.