Sunday, June 30, 2024

Wildflower Designs Sympathy Card

Sadly we recently needed sympathy cards again recently. This card was very much inspired by a card on page 40 of the Stampin' Up! Annual Catalog May 2024-April 2025. If you do not have a copy of the catalog, you can download one in PDF format from this page.

sympathy card created with Wildflower Designs
Since I am relatively new to Stampin' Up! and I do not have many of the colors yet, I relied on my CTMH stash to aid me with completing this card.

From Stampin' Up! I used the Wildflower Designs Bundle (163334) which comes with the Wildflower Designs Stamp Set (163325) and Wildflower Designs Dies (163333), but you could use the Wildflower Designs Stamp Set alone to create this card. I used a sentiment from a past Close To My Heart card subscription kit (if you've followed my posts for awhile, you know I keep the stamp sets from the past card subscription kits nearby when I create). The CTMH colors I used were Journey, Acorn and Pine, but SU! colors Pretty Peacock, Pecan Pie and Shaded Spruce will produce similar results. I used Tuxedo Black Memento Ink Pad (132708) to stamp the sentiment. For cardstock I used White Daisy, Journey and Pine. Basic White, Pretty Peacock and Shaded Spruce.

I created a total of five sympathy cards, one for each daughter and one for three of the granddaughters. Be sure to stop back over the next few days to see each card.

By the way, today is the last day for Bundled Savings. Save an additional 10% on all stamp and die bundles. In addition, save 10% on the Stampin’ Cut & Emboss Machine or the Mini Stampin’ Cut & Emboss Machine. The Bundle Savings can be found here.

Have a great day of rest before the hectic workweek begins again.

Monday, June 24, 2024

Happy Graduation Congratulations

Graduation season is upon us here in New York State. We received an invitation to a graduation party for the great-great-granddaughter of the woman who watched me while my mother worked when I was not old enough to go to school (and for at least one summer when I was to young to be on my grandparents farm). My goodness, that makes me feel old. Here's the card I created for this special occasion.

graduation card created with Sweetly Scripted
While the caption says "created with Sweetly Scripted" (Stampin' Up! item number 163600), in addition to the "congratulations" from that set, this card came together with a mix of items from my collection. In addition to the Sweetly Scripted Cling Stamp Set (163600) from Stampin' Up!, I also used The Future Is Bright Stamp + Thin Cuts (Z4706) in the April-June 2023 Close To My Heart Catalog and some unearthed treasures in my craft stash. Tuxedo Black Memento Ink Pad (132708 is the Stampin' Up! item number) was used for the stamping.

To try to match the school colors better, I used a sheet of green cardstock from my stash. The pearl white cardstock is from Slice (remember that electronic cutting machine from Making Memories?) and was in the Metallic Paper package. I used the pearl white for the cap, tassel and brad (the smallest circle die I own from Tattered Lace Foundation 2 Nested Circles Die Set). Silver foil cardstock was used for the "brad" and tassel (as a shadow to the pearl white) and with a die from Scrapbook.com to cut and emboss the strip of stars.

The class year was created with QuicKutz dies I have had for awhile: the Quickutz 4x8 Dies - Chocolate Alphabet. I cut the apostrophe, two and four in black and green and slightly offset them so the green would have a black shadow. The stars were from set I found on clearance a few years ago: Sizzix Dotted Stars (Sizzix product number 662731). 

I planned to share this card Sunday (the graduation party was Saturday), but the weather did not cooperate and we were without power most of Sunday.

I hope you are inspired to mix some recent additions to your crafting library with some products you have had for a hot minute. Have a great week ahead!

Thursday, June 20, 2024

Layers of Beauty Sympathy Card

If you follow my page on Facebook, Brenda's Paper Crafts, you saw this card a few days ago. I created the card when we learned that someone my mother attended school with passed away.

card created with Layers of Beauty
I stamped the floral spray using the Layers of Beauty Photopolymer Stamp Set (163514) onto white cardstock using Intense Black Ink from Close To My Heart (the Tuxedo Black Memento Ink Pad (132708) from Stampin' Up! is another option). The stamped image was then die cut using the Layers of Beauty Dies (163518). I used an old Cricut cutting mat to hold the die cut in place while I stenciled using the Layers of Beauty Decorative Masks (163517) and Honey Butter, Rosy and Jade Stamp Pads from CTMH.

The Layers of Beauty Bundle (163519) includes the Photopolymer Stamp Set (163514), Dies (163518), and Decorative Masks (163517). The bundle is an extra 10% off the bundled price until June 30, 2024.

The card front was covered with the light side of Jade cardstock from CTMH after it was embossed with the Diamond Embossing Folder (Z3020) from CTMH. The floral spray was added to the card front using foam tape. The sentiment and die cut shape it is stamped on are from the Thoughtful Expressions Cling Stamp Set (162815) and Thoughtful Expressions Dies (162821). This was added to the card with a thinner foam tape.

I used some gold foil cardstock found in my stash to cut the layer placed behind the sentiment and to cut five leaves from the Layers of Beauty Dies (163518). The gold leaves are tucked in several places behind the floral spray. I really wish foiled cardstock photographed better.

This was the second card I created with Layers of Beauty. You will find the first card here.

I am very happy with the results. I hope this card brought a little bit of comfort to the family.

Wednesday, June 19, 2024

Card Sketch "19" in the Stampin' Up! Annual Catalog

Yesterday I showed you the first cards I created inspired by this card sketch in the current Stampin' Up! Annual Catalog:

card sketch "19" on page 22 of the Stampin' Up! Annual Catalog 24-25
While I was creating yesterday's cards I thought "why not squares?" So I played a bit in Cricut Design Space and came up with this:

cards inspired by sketch "19" on page 22 of the Stampin' Up! Annual Catalog 24-25

Again, the blue/green card was created with a blue card panel that was cut on my Cricut Maker. This time I used Stampin’ Dimensionals® (104430) behind the blue squares on the red/blue card (using a stencil cut from heavyweight cardstock to assist with lining up the squares). I used a liquid adhesive add the stars.

Because I always need birthday cards, I used the birthday sentiment from the Sweetly Scripted Cling Stamp Set (163600) and stamped with a Sapphire Stamp Pad from Close To My Heart. I pulled cardstock from my stash so I do not know brand names or colors. The stars are free shapes in Design Space and were cut on my Cricut Maker (four sets of stars are in the file, two different shapes, two sets have the same size stars and the other two have 3 different sizes to add some visual interest) from CTMH White Glitter Paper.

This is the stencil I used to assist with adding the blue drop out circles and square to the red backgrounds. If you cut it from plastic stencil material, it would not want to grab the adhesive on the cardstock piece you are placing and the stencil would probably last forever.

stencil for sketch "19" on page 22 of the Stampin' Up! Annual Catalog 24-25
If you have a Cricut machine and use Cricut Design Space, only free shapes were used to create the card so you should not encounter a cost when using the project. My Cricut Design Space project is here.

I hope you are inspired to try this sketch.

Tuesday, June 18, 2024

Cards Inspired by Stampin' Up! Annual Catalog - Card Sketch "19"

If you've looked at page 22 of the Stampin' Up! Annual Catalog, you might have noticed several card sketches. If you do not have a catalog, you can download a PDF of the catalog here.

page 22 Stampin' Up! Annual Catalog May 2024–April 2025
Note - I numbered the sketches on the screenshot of the catalog above so it would be easier to identify which card sketch inspired the cards I created.

Today I am focusing on sketch "19".

card sketch "19" on page 22 of the Stampin' Up! Annual Catalog 24-25
To create cards based on this sketch I turned to Cricut Design Space and used the free shapes. I knew cutting on my Cricut Maker would be the only way that I would be able to line up all of the circles on this card. You can access my Cricut Design Space project here.

cards inspired by sketch "19" on page 22 of the Stampin' Up! Annual Catalog 24-25
The blue/green card was created with a blue card panel that was cut on my Cricut Maker. Then I began to wonder what I would do with 12 blue circles. I decided to make a stencil from heavy weight cardstock and use the stencil to align the blue circles. I used a liquid adhesive to place the blue circles though the stencil. I decided to decorate the cards with stars, but I think anchors or gems would also be nice. I also decided that some of the stars should be attached in a whimsical alignment to change the look of the card.

Some other variations on this sketch...You could also add some acetate behind the blue layer, use some Foam Adhesive Strips (141825) and sequins to make a shaker card. I attached the blue circles and White Glitter Paper stars flat to the red panel, but you could pop them up with Stampin’ Dimensionals® (104430) to create some depth.

The sentiments were stamped with a Sapphire Stamp Pad from Close To My Heart using the Sweetly Scripted Cling Stamp Set (163600) from Stampin' Up!. Because the cards were my prototypes–to prove to myself my Design Space file works as I expected–I pulled cardstock from my stash so I do not know brand names or colors. The stars were cut on my Cricut Maker (four sets of stars are in the file, two different shapes, two sets have the same size stars and the other two have 3 different sizes to add some visual interest) from CTMH White Glitter Paper.

I hope my cards inspire you to try this sketch.

Take care in this heat wave.

Sunday, June 16, 2024

Birthday Card with Layers of Beauty

Not too long ago I needed to create a birthday card for my niece. This was a great opportunity to create something with the Layers of Beauty Bundle (163519) which includes the Photopolymer Stamp Set (163514), Dies (163518), and Decorative Masks (163517).

card created with Layers of Beauty
In addition to the Layers of Beauty Bundle, I used the Sweetly Scripted Cling Stamp Set (163600) and one of the 2024-2026 In Colors, Shy Shamrock.

I stamped the image with Tuxedo Black Memento Ink. Since I do not have many Stampin' Up! Classic Stampin Pads yet, I used the following CTMH Stamp Pads with Blending Brushes and the Decorative Mask: Royal, Flamingo, Honey Butter, and Clover. I also used a Flamingo Shimmer Brush. The Shimmer Brush did "dull" the shading some, but added some nice shimmer. Next time I will opt for a Clear Shimmer Brush (if you try this technique, make sure you allow your blended ink to fully dry, but even that does not guarantee that your blended ink will not "run" a bit).

To give the Shy Shamrock background some interest, I used my score board and, from the back of the cardstock, I scored some straight lines to create a little visual interest and a faux frame.

The elements were adhered to the card front with two different thicknesses of Foam Tape.

It is always nice to hear that the recipient thinks their card is pretty; I love it when I get feedback from the person the card was intended for.

I hope you have a wonderful Sunday and week ahead. Take care.

Saturday, June 15, 2024

Today's Tip - Creating A2 Card Bases

As I mentioned the other day, I've been thinking more and more about creating my own card bases. One reason for creating my own card bases is to have the color on the entire front of my cards without adding another layer. Adding an additional colored cardstock layer to the card front adds some weight which may make it difficult to stand the card up and/or require more postage. It adds thickness which, added with the other embellishments, may make it hard to fit the card in the envelope and/or require more postage. Adding another layer also uses more paper. Finally, let's be honest, it can be difficult to line up just right so no white shows around the edges.

When I began my cardmaking journey years ago, I wish I had a quick reference for all of my questions. I write this post with new, and returning-to-paper, crafters in mind and for those who like to measure twice, double-check the measurements one more time, and cut once.

My personal preference for A2 (4¼" × 5½") cards is a side fold card which I can use as a 5½" high by 4¼" wide card (portrait) or as a 4¼" high by 5½" wide card (landscape). You will find many examples of this card size/style on my blog.

This diagram (partially mocked up in Cricut Design Space) shows how I go about cutting 8½" × 11" cardstock to create an A2 side fold card base.

A2 side fold cutting & scoring diagram
I think the A2 side fold portrait card is the most popular hand crafted card size. This is how Close To My Heart White Cards & Envelopes Value Pack (X254) were cut and scored. I have not purchased the Stampin' Up! Basic White Note Cards & Envelopes (159232) yet, but from the photo online, I believe this is how the cards are cut and scored as well. Cards cut and scored like this are easy to create and display, even with embellishments, because having the fold on the side prevents the card from opening in its entirety–the fold acts as a "anchor". When this card is displayed with the score at the top (landscape), it can "sag" a bit, but on a future post I will show you what you can do to prevent that.

I have read blog posts by and watched videos from people who prefer a top fold A2 card (portrait). For myself, I think this card style is nice when you know you will decorate your card so it is 5½" high, but what do you do when you found the perfect large sentiment, but it is too wide for a 4¼" wide card? This diagram (partially mocked up in Cricut Design Space) shows how I go about cutting 8½" × 11" cardstock to create an A2 top fold card base.
A2 top fold cutting & scoring diagram
It is not common, but I have seen videos where a card has the fold on the left and the card is 4¼" high and 5½" wide (landscape), but personally I do not prefer to create cards in this format. The nicest thing about creating cards this way is they are still a standard A2 size and finding envelopes to fit is relatively easy.

In future posts I will share how I cut Slimline cards, 4" × 6" cards and I will talk about using 12" × 12" cardstock to cut A2 (4¼" × 5½") cards.

I hope everyone, from new card makers to seasoned card makers found something helpful on today's post. If there are any topics you would like me to cover, please reach out via the contact form to the right and I will add it to my list of topics.

Please find a way to beat the heat that is heading our way. Take it easy and drink enough water. Putting the AC units in is at the top of my to do list for Sunday. Despite the heat, have a great week ahead.

Sunday, June 9, 2024

Today's Tip - Card Sizes

Today's post is a continuation of my post about getting started with card making. Yesterday I wrote about minimum and maximum sizes for cards and letters to go through the United States Postal Service. I mentioned how I avoid cards that are too thick and I shared links to the USPS websites where mailing sizes, thickness and weight limitations are listed.

Today I am comparing what was familiar to me, Close To My Heart cards and envelopes, to what Stampin' Up! offers. I noticed that there can be some subtle differences between CTMH and Stampin' Up! cards/envelopes and I want to be sure that you are aware of them.

According to several sites I found online, including Cards for Causes, the 4¼" × 5½" card size is referred to A2 and 5" × 7" is A7. I did not find an alpha-numeric "standard" for 3½" × 8½" (Slimline) there, but Jennifer McGuire has this post, All About Slimline Cards, where she refers to the 3½" × 8½" size as the Popular Slimline which would fit a #9 Envelope.

Standard Greeting Card Sizescard sizeenvelope size
A24¼" × 5½"4⅜" × 5¾" (A2)
A75" × 7"5¼" × 7¼" (A7)
Slimline3½" × 8½"3⅞" × 8⅞" (#9)

I updated this post to add this section...I've been scanning the Close To My Heart Blog and found a DIY Photo Cards! post where they listed several card sizes and the envelope that works with each card size; unfortunately the post will be disappearing soon with the closure of CTMH. Here's the list of card sizes and envelopes with links to envelope sizes CTMH and SU! do not carry:

Card SizeEnvelope Type
3″ x 5″4BAR
4″ x 6″A6
5″ x 7″A7
5″ x 5″5¾” Square
6″ x 6″6½” Square

The link CTMH shared to the 6½” Square envelopes now lands all available envelopes from Paper Source. At the bottom of the envelope page you will find an Envelope Size & Style Guide and if you select "Size Chart" under Paper Bar on the left menu you will find this Stationary Components Size Guide that is great for seeing what A# is what size in inches. While I was trying to find a link to 6½” Square envelopes, I found a guide on How To Make an Envelope Liner and Envelope Liner Template Kit to aid with creating the envelope liner if the flaps on your envelopes have a similar shape and size. If you are creating unique shaped cards, remember that additional postage might be required, and you may want an Envelope Template Kit (creates six sizes of envelopes) to create your own envelopes if you are unable to find the envelope size you need.

Comparing Close To My Heart Cards/Envelopes to Stampin' Up! Options

If you are familiar to the cards and envelopes from Close To My Heart our options were:

CTMH product nameitem numberproduct descriptioncard size
White Cards & Envelopes Value PackX25450 card bases and envelopes4¼" × 5½"
5" × 7" White Cards & EnvelopesX25820 card bases and envelopes5" × 7"
Slimline Cards & EnvelopesX25720 white card bases and envelopes3½" × 8½"

While looking through the new Stampin' Up! Annual Catalog, I noticed a variety of cards available:
   
Stampin' Up! product nameitem numberproduct descriptioncard sizeenvelope size
Sunny Springs Cards & Envelopes1637545 cards and 5 envelopes:
    1 each of 5 designs
4¼" × 5½"4¾" × 5½"
Calming Creek Cards & Envelopes1637535 cards and 5 envelopes:
    1 each of 5 designs
4¼" × 5½"4⅜" × 5¾"
Brushed Gold Cards & Envelopes16217720 cards and 20 envelopes4¼" × 5½"4½" × 5¾"
Basic White Note Cards & Envelopes15923220 cards and 20 envelopes5" × 3½"5⅛" × 3⅝"
Basic White Assorted Memories & More Cards & Envelopes15923420 total Memories & More
card bases and 20 total
envelopes: 10 small and 10 large
small & large (details below)4½" × 5¾"
Basic White Medium Envelopes15923640 envelopes (fits 5½" × 4¼" cards)n/a5¾" × 4⅜"
Clear Medium Envelopes10261950 envelopes (fits 5½" × 4¼" cards)n/a5¾" × 4⅜"

The Sunny Springs and Calming Creek Cards & Envelopes are printed cards with envelopes that have the same pattern on the envelopes; the liner matches the card exactly and envelope itself is a subtle version of the pattern. The Brushed Gold Cards & Envelopes look like someone took a large paintbrush and gold paint to the card and envelope. I think the Brushed Gold would make fabulous holiday cards.

The Basic White Note Cards & Envelopes are little smaller than what CTMH Makers and customers are used to. They are ½" shorter in one direction and are ¾" shorter in the other. While this is good as far as saving paper if you are covering the entire card front, there were many times I wanted a "canvas" that was larger than 4¼" × 5½".

The Basic White Assorted Memories & More Cards & Envelopes are designed to work with cards from Memories & More Card Packs. The Memories & More Card Packs are similar to the Picture My Life cards CTMH carried. The small card bases work with the 3" × 4" Memories & More cards while the large card bases with the 4" × 6" Memories & More cards.

At this point in time, Stampin' Up! does not offer a White 5" × 7" or Slimline card and envelope options (I did notice the Sweet Springtime Paper Pumpkin Past Kit (164385) has a slimline card where the finished size is 3¼" × 6¼"). I have not heard anything about Stampin' Up! expanding their card size options. I've created both 5" × 7" or Slimline card, but they are not my go to sizes so I am unsure how many other people would miss these sizes.

Since Stampin' Up! carries 8½" × 11" cardstock that is a good weight for card bases, my impression is many Stampin' Up! Demonstrators and customers make their own card bases. Stampin' Up! has two envelope only options that fit 5½" × 4¼" cards. Once is translucent so your decorated masterpiece shows through. The 8½" × 11" cardstock is one of the reasons I am thinking about creating more of my card bases in the future.

Stop by in a day or two when I share different ways I plan to create card bases, including creating the card bases from 12" × 12" cardstock.

Have a great week ahead. Don't forget Father's Day will soon be here.

Saturday, June 8, 2024

Today's Tip - Mailing Your Cards

I originally was going to write one post about cards, but it become so long that it needed to be split into three posts. There are three things that lead me to start writing about cards. Did you know that there are minimum and maximum sizes for cards and letters to go through the United States Postal Service or there is an extra charge for mailing? Also, if you enjoyed the cardmaking supplies from Close To My Heart, I want to be sure that you are aware there can be some subtle differences between CTMH and Stampin' Up! cards/envelopes. Finally, I have been mulling different ways to create my card bases. I will share my thoughts and the pros and cons (as I see them) with you so you can determine what is best for you in your cardmaking journey. Some of the information I share might be "old news" to some readers, but there are probably some new card makers who would like to learn.

Mailing Your Cards via the USPS

Did you know that the USPS has physical standards for postcards and letters and if the item you are mailing may cost more if it does meet the requirements?  Greeting cards mailed in the United States have to meet the requirements of First-Class Mail or there is an extra charge to mail them. Please see First-Class Mail at the USPS website for features and pricing.

The two biggest concerns I hear when card makers talk about mailing their creations are: the USPS told me the card was too thick or the card weighed too much. There is a minimum and maximum length and height and a maximum thickness for cards sent via the USPS to addresses within the USA (including military destinations). The sizes for postcards, letters, large envelopes and packages are posted at Mailpiece Dimensions. The maximum weight is shared on the First-Class Mail page. I am not sharing the specific numbers here in case the USPS policies change causing any information I share here to be outdated.

To avoid the two biggest concerns most people have, I often used CTMH's Thin 3-D Foam Tape to create my cards and selected thinner embellishments or opted for using Stickles™ Glitter Glue, Liquid Pearls™, or similar rather than gems, buttons, etc. I recently purchased Mini Stampin' Dimensionals (144108) and Stampin' Dimensionals (104430) from Stampin' Up! and found them to be similar in thickness to the Thin 3-D Foam Tape. I cut a piece of heavy weight cardstock with a 1/4" slot in the middle to test the thickness of my envelopes and I use a kitchen scale to weigh my envelopes.

Please note that unusually shaped mail, including square and vertical envelopes, and envelopes with other features (string, buttons, etc.) must be hand-canceled and are charged a nonmachinable surcharge. See the "Additional Charges for Irregular Mailpieces & Envelopes" section on the First-Class Mail page. Finally, you will always find the current prices for domestic and international mail at Price List - First-Class Mail.

I do not have first hand experience with mailing in other countries, but my impression is mail requirements are not as strict in the UK, Canada and other countries. I often see square cards created by UK crafters. I could be wrong, so if you are abroad and want to mail something, you should check with the local Postal Service before popping something in the mail. Other than the USPS website, the person working at the Post Office will always have the best answers to your questions.

I hope I shared something new for the long-time card makers and gave new card makers some good references for keeping their cards within the First Class requirements.

Come back in a day or so for a comparison of the card options Close To My Heart has and what Stampin' Up! offers in their Annual Catalog.

Thank you for stopping by today.

Wednesday, June 5, 2024

Lake Life, Other Exclusive CTMH™ Products and Bundle Sale

Happy June 5th! Today is the day!

[I forgot to mention this the other day...If your order (product total) is less than $150, please use Host Code UZGAQWS7 when you place your June orders. If your product total will be $150 or more, do not use the Host Code. Instead, look for the prompts in your Shopping Cart to add the Stampin' Rewards that you are eligible for. If the combined orders using the Host Code, placed by noon on June 30, reach a reward level, I will put your name in a drawing to receive the rewards. Your name can be added to the drawing multiple times, for each $25 you spend. Please be sure to check your mail the evening of June 30 because we only have 30 days from the day the code is created to close the order and redeem for the rewards]

Another selection of Exclusive CTMH™ Products are now available to order.

Cover June 2024 Exclusive CTMH™ Products
Cover June 2024 Exclusive CTMH™ Products Flyer
Lake Life is the collection that is being released (paper, scrapbooking and cardmaking stamps + Thin Cuts, scrapbooking and cardmaking workshops, etc.). In addition, there is a mix-in paper and coordinating cardstock, a stamp set that is perfect for thanking the educators in your life and a stamp + Thin Cuts "Hug In a Mug" that is great year-round celebrations. The digital brochure shows all of the options.

The colors featured in Lake Life are Acorn, Pine, Sage, Seabrook, Glacier, and White Daisy. There are even more limited quantities of Acorn, Pine, Sage, Seabrook, and Glacier cardstock and Exclusive Inks™ Stamp Pads available. 

The colors featured in the Mix-In Paper Packet are Acorn, Pumpkin, Sundance, Limeade, Pine, and Black. If you purchase the Mix-In Coordinating Cardstock, you will receive one sheet of each color.

In addition, the Bundle Sale begins today.

Stampin' Up! Bundle Sale

Between June 5–30 save an additional 10% on all stamp and die bundles (excluding CTMH branded items)! Also enjoy a savings of 10% on the Stampin’ Cut & Emboss Machine or the Mini Stampin’ Cut & Emboss Machine. If you don’t already have a machine, there is no better time than during this sale. Or maybe you’re thinking of getting the Mini Stampin’ Cut & Emboss Machine to take with you when you are on the go. What a great opportunity to add bundles or a die cutting machine to your "tool chest" when you will get an extra discount!

Finally, two new all-inclusive crafting kits will debut today. Check the Kits Collection page on the Stampin' Up! website.

It's supposed to be a hot one today. Be sure to keep hydrated and try to stay in a cooler location. I should have installed the air conditioners last weekend.

Sunday, June 2, 2024

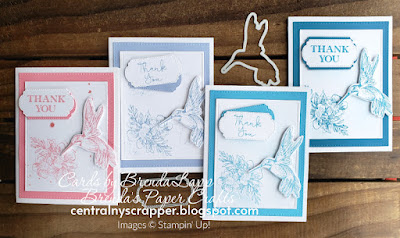
Thoughtful Expressions Thank You Cards

I recently created and sent (or delivered) a few Thank You cards.

cards created with Thoughtful Expressions Stamp Set and Dies

To aid with keeping the cards quicker to complete, they are the same other than varying the colors, sentiments and how I applied a little color around the flowers and the hummingbird.

The flowers, hummingbird and die used for the sentiment layer are from the Thoughtful Expressions Bundle (included the Stamp and Die Set) from Stampin' Up! The color and White Daisy cardstock layers were cut with a Spellbinders die set I've had for years. The cardstock and inks are from Close To My Heart (Flamingo, Wisteria, Carpi and Journey). The sentiments are from past Close To My Heart card subscription kits.

I cut a scrap of cardstock with the die that coordinates with the flowers to protect that area when adding ink to the White Daisy layer. I added splatters from a Shimmer Brush on the Flamingo card. I used wadded plastic film (from packaging) to add color on the Wisteria card. A blending brush was used on the Capri card and a sponge helped me add color on the Journey card. I love the different look each technique creates.

I hope you have a fantastic first week of June and find a little time to be creative. Take care!